
背景
Cloud Native
随着 LLM(大语言模型)技术的不断成熟和应用场景的不断拓展,越来越多的企业开始将 LLM 技术纳入自己的产品和服务中。LLM 在自然语言处理方面表现出令人印象深刻的能力。然而,其内部机制仍然不明确,这种缺乏透明度的做法给下游应用带来了不必要的风险,这也导致了 LLM 应用落地难等问题。因此,理解和解释这些模型对于阐明其行为、局限性和社会影响至关重要。LLM 可观测性能够为模型可解释性提供必要的数据支撑,对于研究人员和开发人员来说,LLM 应用可观测,可以识别意外的偏见、风险和性能改进。
作为 AI 时代的编程语言,Python 在近年来得到了广泛的应用。目前热门的 LLM 项目,如 Langchain、Llama-index、Dify、PromptFlow、OpenAI、Dashscope 等均使用 Python 语言进行开发。为增强对 Python 应用,特别是 Python LLM 应用的可观测性,阿里云推出了 Python 探针,旨在解决 LLM 应用落地难、难落地等问题。助力企业落地 LLM。
本文将从阿里云 Python 探针的接入步骤、产品能力、兼容性等方面展开介绍。并提供一个简单的 LLM 应用例子,方便测试。
应用示例
Cloud Native
为方便大家理解和感受 Python 探针的功能,本文构建了一个 LLM 应用的示例:某公司升级了其产品,新增了智能问答功能。其基本架构图如下:

基本业务流程为用户向 server 端发起一个问答请求,server 去调用 chatbot 获取回复结果,chatbot 收到请求后进行 RAG 后回复。
为观测此 LLM 应用,该公司接入了阿里云 Python 探针。下文将介绍如何接入阿里云 Python 探针。
Python 应用接入应用监控
以下为在 ACK 环境下 Python 探针的接入方式,其他接入方式见:https://help.aliyun.com/zh/arms/application-monitoring/user-guide/start-monitoring-python-applications/
前提条件
创建 Kubernetes 集群。您可按需选择创建 ACK 专有集群、创建 ACK 托管集群或创建 ACK Serverless 集群。创建命名空间,具体操作,请参见管理命名空间与配额。本文示例中的命名空间名称为 arms-demo。检查您的 Python 版本和框架版本。具体要求,请参见 Python 探针兼容性要求。步骤一:安装 ARMS 应用监控组件
1. 登录容器服务管理控制台[1]。
2. 在左侧导航栏单击集群,然后在集群列表页面单击目标集群名称。
3. 在左侧导航栏选择运维管理 > 组件管理,然后在右上角通过关键字搜索 ack-onepilot。(重要:请确保 ack-onepilot 的版本在 3.2.4 及以上。)
4. 在 ack-onepilot 卡片上单击安装。(说明:ack-onepilot 组件默认支持 1000 个 pod 规模,集群 pod 每超过 1000 个,ack-onepilot 资源对应的 CPU 请增加 0.5 核、内存请增加 512M。)
5. 在弹出的页面中可以配置相关的参数,建议使用默认值,单击确定。(说明:安装完成后,您可以在组件管理页面升级、配置或卸载 ack-onepilot 组件。)
步骤二:修改 Dockerfile
1. 首先从 pypi 仓库下载探针安装器
pip3 install aliyun-bootstrap2. 使用 aliyun-bootstrap 安装探针
aliyun-bootstrap -a install3. 使用阿里云 python 探针启动
aliyun-instrument python app.py4. 构建镜像,具体的 Dockerfile 示例如下:
Dockerfile 示例:更改前的 Dockerfile:
# 使用Python 3.10基础镜像FROM docker.m.daocloud.io/python:3.10# 设置工作目录WORKDIR /app# 复制requirements.txt文件到工作目录COPY requirements.txt .# 使用pip安装依赖RUN pip install --no-cache-dir -r requirements.txtCOPY ./app.py /app/app.py# 暴露容器的8000端口EXPOSE 8000CMD ["python","app.py"]更改后的 Dockerfile:# 使用官方的Python 3.10基础镜像FROM docker.m.daocloud.io/python:3.10# 设置工作目录WORKDIR /app# 复制requirements.txt文件到工作目录COPY requirements.txt .# 使用pip安装依赖RUN pip install --no-cache-dir -r requirements.txt#########################安装aliyun python 探针###############################RUN pip3 install aliyun-bootstrap && aliyun-bootstrap -a install##########################################################COPY ./app.py /app/app.py# 暴露容器的8000端口EXPOSE 8000#########################################################CMD ["aliyun-instrument","python","app.py"]注意事项(必看)1. 有使用 unicorn 启动的应用推荐使用以下命令做替换:
例如:
unicorn -w 4 -b 0.0.0.0:8000 app:app更改为:
gunicorn -w 4 -k uvicorn.workers.UvicornWorker -b 0.0.0.0:8000 app:app2. 有使用 gevent 协程的需要配置参数
程序中有使用
from gevent import monkey
monkey.patch_all()
需要设置环境变量 GEVENT_ENABLE=true
GEVENT_ENABLE=true步骤三:授予 ARMS 资源的访问权限
如果需监控 ASK(容器服务 Serverless 版)或对接了 ECI 的集群应用,请在云资源访问授权[2]页面完成授权,然后重启 ack-onepilot 组件下的所有 Pod。如果需监控 ACK 集群应用,但 ACK 集群中不存在 ARMS Addon Token,请执行以下操作手动为集群授予 ARMS 资源的访问权限。如果已经存在 ARMS Addon Token,请跳转至步骤四。查看集群是否存在 ARMS Addon Token:
a. 登录容器服务管理控制台,在集群列表页面,单击目标集群名称进入集群详情页。b. 在左侧导航栏选择配置管理 > 保密字典,然后在顶部选择命名空间为kube-system,查看addon.arms.token是否存在。说明:集群存在 ARMS Addon Token 时,ARMS 会进行免密授权。Kubernetes 托管版集群默认存在 ARMS Addon Token,但对于部分早期创建的 Kubernetes 托管版集群,可能会存在没有 ARMS Addon Token 的情况,因此,对于 Kubernetes 托管版集群,建议首先检查 ARMS Addon Token 是否存在。若不存在,需进行手动授权。
1. 登录容器服务管理控制台。
2. 在左侧导航栏选择集群,然后单击目标集群名称。
3. 在目标集群的集群信息页面单击集群资源页签,然后单击 Worker RAM 角色右侧的链接。
4. 在角色页面的权限管理页签上,单击新增授权。
5. 选择权限为 AliyunARMSFullAccess,然后单击确定。(如果需要监控专有版集群和注册集群应用,请确认对应的阿里云账号已包含 AliyunARMSFullAccess 和 AliyunSTSAssumeRoleAccess 权限。添加权限的操作,请参见为 RAM 用户授权[3]。)
安装 ack-onepilot 组件后,还需要在 ack-onepilot 中填写有 ARMS 权限的阿里云账号 AK/SK。
1. 在左侧导航栏选择应用 > Helm 页面,单击 ack-onepilot 组件右侧的更新。
2. 将 accessKey 和 accessKeySecret 替换为当前账号的 AccessKey,然后单击确定。(说明:获取 AccessKey 的操作,请参见创建 AccessKey[4]。)
3. 重启应用 Deployment。
步骤四:为 Python 应用开启 ARMS 应用监控
1. 在容器服务管理控制台左侧导航栏单击集群,在集群列表页面上的目标集群右侧操作列单击应用管理。
2. 在无状态页面的目标应用右侧选择更多 > 查看 YAML。(如需创建一个新应用,单击右上角的使用 YAML 创建资源。)
3. 在 YAML 文件中将以下 labels 添加到 spec.template.metadata 层级下。
labels: aliyun.com/app-language: python # Python应用必填,标明此应用是Python应用。 armsPilotAutoEnable: 'on' armsPilotCreateAppName: "<your-deployment-name>" #应用在ARMS中的展示名称。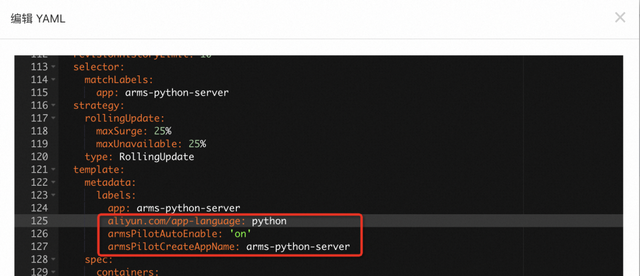
创建一个无状态(Deployment)应用并开启 ARMS 应用监控的完整 YAML 示例模板如下:
apiVersion: apps/v1kind: Deploymentmetadata: labels: app: arms-python-client name: arms-python-client namespace: arms-demospec: progressDeadlineSeconds: 600 replicas: 1 revisionHistoryLimit: 10 selector: matchLabels: app: arms-python-client strategy: rollingUpdate: maxSurge: 25% maxUnavailable: 25% type: RollingUpdate template: metadata: labels: app: arms-python-client aliyun.com/app-language: python # Python应用必填,标明此应用是Python应用。 armsPilotAutoEnable: 'on' armsPilotCreateAppName: "arms-python-client" #应用在ARMS中的展示名称。 spec: containers: - image: registry.cn-hangzhou.aliyuncs.com/arms-default/python-agent:arms-python-client imagePullPolicy: Always name: client resources: requests: cpu: 250m memory: 300Mi terminationMessagePath: /dev/termination-log terminationMessagePolicy: File dnsPolicy: ClusterFirst restartPolicy: Always schedulerName: default-scheduler securityContext: {} terminationGracePeriodSeconds: 30---apiVersion: apps/v1kind: Deploymentmetadata: labels: app: arms-python-server name: arms-python-server namespace: arms-demospec: progressDeadlineSeconds: 600 replicas: 1 revisionHistoryLimit: 10 selector: matchLabels: app: arms-python-server strategy: rollingUpdate: maxSurge: 25% maxUnavailable: 25% type: RollingUpdate template: metadata: labels: app: arms-python-server aliyun.com/app-language: python # Python应用必填,标明此应用是Python应用。 armsPilotAutoEnable: 'on' armsPilotCreateAppName: "arms-python-server" #应用在ARMS中的展示名称。 spec: containers: - env: - name: CLIENT_URL value: 'http://arms-python-client-svc:8000' - image: registry.cn-hangzhou.aliyuncs.com/arms-default/python-agent:arms-python-server imagePullPolicy: Always name: server resources: requests: cpu: 250m memory: 300Mi terminationMessagePath: /dev/termination-log terminationMessagePolicy: File dnsPolicy: ClusterFirst restartPolicy: Always schedulerName: default-scheduler securityContext: {} terminationGracePeriodSeconds: 30---apiVersion: v1kind: Servicemetadata: labels: app: arms-python-server name: arms-python-server-svc namespace: arms-demospec: internalTrafficPolicy: Cluster ipFamilies: - IPv4 ipFamilyPolicy: SingleStack ports: - name: http port: 8000 protocol: TCP targetPort: 8000 selector: app: arms-python-server sessionAffinity: None type: ClusterIPapiVersion: v1kind: Servicemetadata: name: arms-python-client-svc namespace: arms-demo uid: 91f94804-594e-495b-9f57-9def1fdc7c1dspec: internalTrafficPolicy: Cluster ipFamilies: - IPv4 ipFamilyPolicy: SingleStack ports: - name: http port: 8000 protocol: TCP targetPort: 8000 selector: app: arms-python-client sessionAffinity: None type: ClusterIP执行结果
Cloud Native
待容器完成自动重新部署后,等待 1~2 分钟,在 ARMS 控制台的应用监控 > 应用列表页面单击应用名称,查看应用的监控指标。更多信息,请参见查看监控详情(新版)。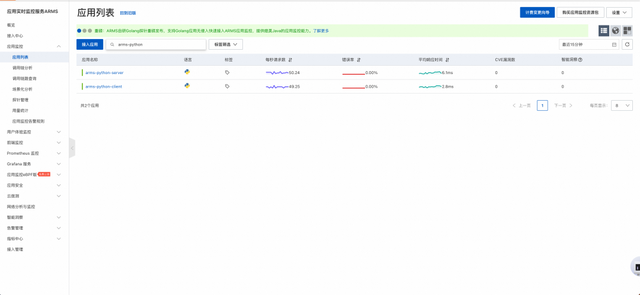
产品能力
Cloud Native
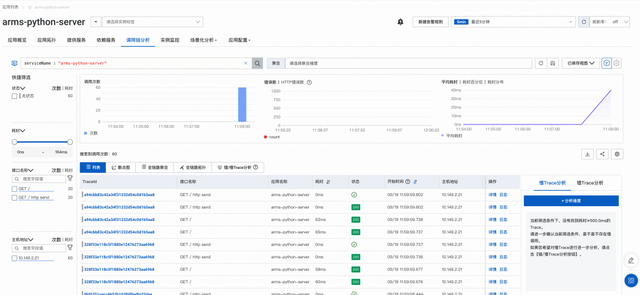
应用接入成功后,就可以通过:https://arms.console.aliyun.com/#/tracing/list/cn-hangzhou来查看 Python 应用的信息了。以下是一些内容的展示:调用链分析
微服务场景
调用链分析功能可以通过自由组合筛选条件与聚合维度进行实时分析,并支持通过错/慢 Trace 分析功能,定位系统或应用产生错、慢调用的原因。
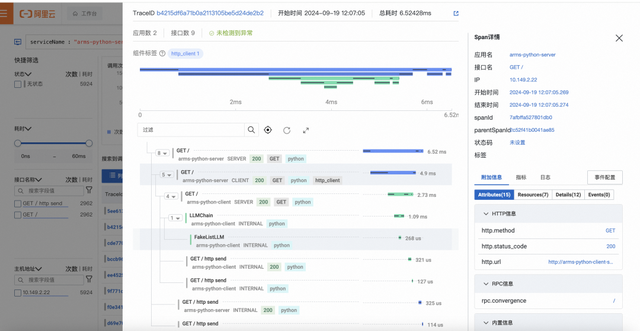
调用链详情:
大模型场景
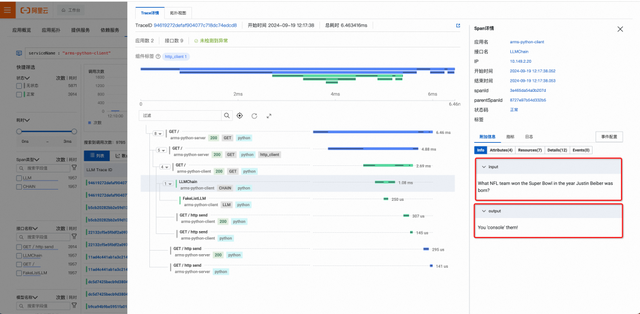
针对大模型场景,您可以查看 LLM 领域的新版 TraceView,更直观地分析不同操作类型的输入输出、Token 消耗等信息。
首先切换为大模型视图:
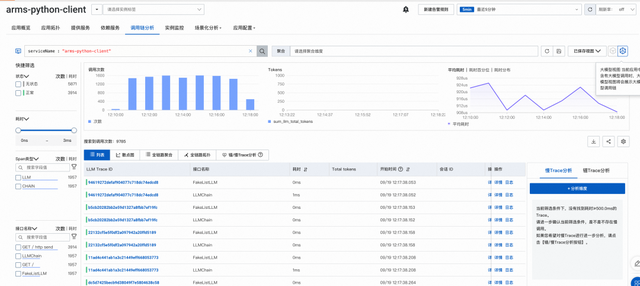
具体的大模型调用信息:
监控指标
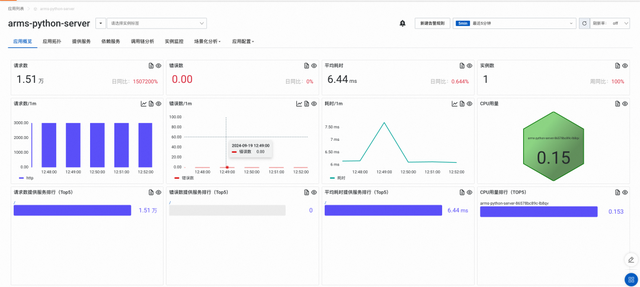
应用概览
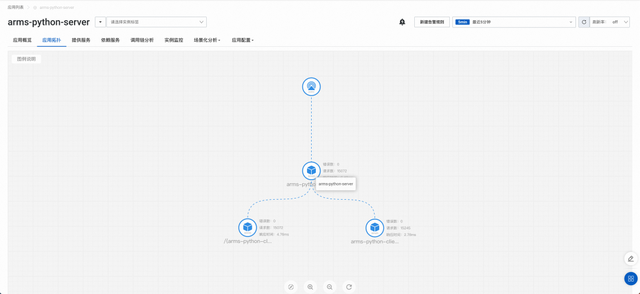
应用拓扑
配置告警
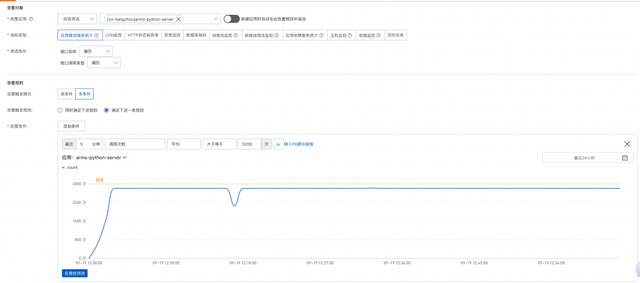
通过配置告警,您可以制定针对特定应用的告警规则。当告警规则被触发时,系统会以您指定的通知方式向告警联系人或钉群发送告警信息,以提醒您采取必要的解决措施。具体操作,请参见应用监控告警规则[5]。
兼容性
Cloud Native
Python 版本>=3.8附件
Cloud Native
arms-python-server:
import uvicornfrom fastapi import FastAPI, HTTPExceptionfrom logging import getLoggerfrom concurrent import futuresfrom opentelemetry import tracetracer = trace.get_tracer(__name__)_logger = getLogger(__name__)import requestsimport osdef call_requests(): url = 'https://www.aliyun.com' # 替换为你的实际地址 call_url = os.environ.get("CALL_URL") if call_url is None or call_url == "": call_url = url # try: response = requests.get(call_url) response.raise_for_status() # 如果请求返回了错误码则抛出异常 print(f"response code: {response.status_code} - {response.text}")app = FastAPI()def call_client(): _logger.warning("calling client") url = 'https://www.aliyun.com' # 替换为你的实际地址 call_url = os.environ.get("CLIENT_URL") if call_url is None or call_url == "": call_url = url response = requests.get(call_url) # print(f"response code: {response.status_code} - {response.text}") return response.text@app.get("/")async def call(): with tracer.start_as_current_span("parent") as rootSpan: rootSpan.set_attribute("parent.value", "parent") with futures.ThreadPoolExecutor(max_workers=2) as executor: with tracer.start_as_current_span("ThreadPoolExecutorTest") as span: span.set_attribute("future.value", "ThreadPoolExecutorTest") future = executor.submit(call_client) future.result()# call_client() return {"data": f"call"}if __name__ == "__main__": uvicorn.run(app, host="0.0.0.0", port=8000)arms-python-client:
from fastapi import FastAPIfrom langchain.llms.fake import FakeListLLMimport uvicornfrom langchain.chains import LLMChainfrom langchain.prompts import PromptTemplateapp = FastAPI()llm = FakeListLLM(responses=["I'll callback later.", "You 'console' them!"])template = """Question: {question}Answer: Let's think step by step."""prompt = PromptTemplate(template=template, input_variables=["question"])llm_chain = LLMChain(prompt=prompt, llm=llm)question = "What NFL team won the Super Bowl in the year Justin Beiber was born?"@app.get("/")def call_langchain(): res = llm_chain.run(question) return {"data": res}if __name__ == "__main__": uvicorn.run(app, host="0.0.0.0", port=8000)相关链接:[1] 容器服务管理控制台
https://account.aliyun.com/login/login.htm?oauth_callback=https%3A%2F%2Fcs.console.aliyun.com%2F
[2] 云资源访问授权
https://account.aliyun.com/login/login.htm?oauth_callback=https%3A%2F%2Fram.console.aliyun.com%2Frole%2Fauthorization%3Frequest%3D%257B%2522Services%2522%253A%255B%257B%2522Service%2522%253A%2522ECS%2522%252C%2522Roles%2522%253A%255B%257B%2522RoleName%2522%253A%2522AliyunMSEForECIRole%2522%252C%2522TemplateId%2522%253A%2522AliyunMSEForECIRole%2522%257D%255D%257D%255D%252C%2522ReturnUrl%2522%253A%2522https%253A%252F%252Farms.console.aliyun.com%2522%257D&clearRedirectCookie=1&lang=zh
[3] RAM 用户授权
https://help.aliyun.com/zh/ram/user-guide/grant-permissions-to-the-ram-user
[4] 创建 AccessKey
https://help.aliyun.com/zh/ram/user-guide/create-an-accesskey-pair
[5] 应用监控告警规则
https://help.aliyun.com/zh/arms/application-monitoring/user-guide/create-and-manage-alert-rules-in-application-monitoring-new/
参考链接:https://help.aliyun.com/zh/arms/application-monitoring/user-guide/start-monitoring-python-applications/
https://help.aliyun.com/zh/arms/application-monitoring/developer-reference/python-probe-compatibility-requirements