通过 HarmonyOS Developer 官网我们可以了解 ArkUI 是一套声明式开放框架,开发者可以基于 ArkTS 语法设计一套极简的 DSL 以及丰富的 UI 组件完成跨设备的界面开发。
那么 ArkUI 是如何实现这一套声明式开放框架的呢?本文将通过分析开源的 HarmonyOS 渲染引擎 AceEngine 代码以及配套工程能力来进行详细解读。
本篇文章仅先针对响应式和工程化进行浅谈。

响应式
▐从一个示例来看响应式下面是笔者通过 DevEcoStudio 开发者工具模板实例化出来的一个 HelloWorld 实例,从这个简单的片段中我们可以看出来结构体中的 message 就是驱动数据,在 onClick 事件中更改值时,会触发界面发生更新。
@Entry@Componentstruct Index { @State message: string = 'Hello World' build() { Row() { Column() { Text(this.message) .fontSize(50) .fontWeight(FontWeight.Bold) } .width('100%') .onClick(()=>{ this.message = "Test Reactive" }); } .height('100%') }}ArkUI 这套 DSL 封装了很多注解,让开发者可以专注在这套声明式的框架内,不用去关心数据驱动视图变更的细节。
为了更加深入了解背后的细节,笔者寻找到了这些注解语法糖编译后的产物,来进行更进一步的分析。
build/default/cache/default/default@CompileArkTS/esmodule/debug/entry/src/main/ets/pages/Index.js
▐产物分析通过产物可以看到更多语法糖背后的实质操作:
首先可以清晰看到,在编译后的产物中有针对数据源值的操作,利用重写 Componet属性描述器 get set劫持message的读写操作,message操作最终落入到了ObserverdPropertySimplePU中。因此可以看出 ArkUI 的响应式和 Vue 还是非常相似的,都是通过来 Magic Function 追踪属性的读取。
class Index extends ViewPU { constructor(parent, params, __localStorage, elmtId = -1) { super(parent, __localStorage, elmtId); this.__message = new ObservedPropertySimplePU('Hello World', this, "message"); this.setInitiallyProvidedValue(params); } get message() { return this.__message.get(); } set message(newValue) { this.__message.set(newValue); } initialRender() { this.observeComponentCreation((elmtId, isInitialRender) => { ViewStackProcessor.StartGetAccessRecordingFor(elmtId); Row.create(); Row.height('100%'); if (!isInitialRender) { Row.pop(); } ViewStackProcessor.StopGetAccessRecording(); }); this.observeComponentCreation((elmtId, isInitialRender) => { ViewStackProcessor.StartGetAccessRecordingFor(elmtId); Column.create(); Column.width('100%'); Column.onClick(() => { this.message = "Test Reactive"; }); if (!isInitialRender) { Column.pop(); } ViewStackProcessor.StopGetAccessRecording(); }); this.observeComponentCreation((elmtId, isInitialRender) => { ViewStackProcessor.StartGetAccessRecordingFor(elmtId); Text.create(this.message); Text.fontSize(50); Text.fontWeight(FontWeight.Bold); if (!isInitialRender) { Text.pop(); } ViewStackProcessor.StopGetAccessRecording(); }); Text.pop(); Column.pop(); Row.pop(); }}▐追踪依赖的过程在数据被读取的过程中,将当前正在渲染的元素加入到dependentElmtIdsByProperty_中去。
/** * during 'get' access recording take note of the created component and its elmtId * and add this component to the list of components who are dependent on this property */ protected recordPropertyDependentUpdate() : void { const elmtId = this.getRenderingElmtId(); this.dependentElmtIdsByProperty_.addPropertyDependency(elmtId); }回看产物代码中的初始函数,每个节点的构建都形成了一个闭包函数并传入到observeComponentCreation中。
this.observeComponentCreation((elmtId, isInitialRender) => { ViewStackProcessor.StartGetAccessRecordingFor(elmtId); Row.create(); Row.height('100%'); if (!isInitialRender) { Row.pop(); } ViewStackProcessor.StopGetAccessRecording(); });同时在observeComponentCreation中又维护了renderEletIdStack,并且将 updateFunc 关联元素存储上。整个过程基本和Vue创建Effect和维护Dep的过程类似。
public observeComponentCreation(compilerAssignedUpdateFunc: UpdateFunc): void { const updateFunc = (elmtId: number, isFirstRender: boolean) => { this.currentlyRenderedElmtIdStack_.push(elmtId); compilerAssignedUpdateFunc(elmtId, isFirstRender); this.currentlyRenderedElmtIdStack_.pop(); } const elmtId = ViewStackProcessor.AllocateNewElmetIdForNextComponent(); this.updateFuncByElmtId.set(elmtId, { updateFunc: updateFunc }); UINodeRegisterProxy.ElementIdToOwningViewPU_.set(elmtId, new WeakRef(this)); try { updateFunc(elmtId, /* is first render */ true); } catch (error) { // avoid the incompatible change that move set function before updateFunc. this.updateFuncByElmtId.delete(elmtId); UINodeRegisterProxy.ElementIdToOwningViewPU_.delete(elmtId); throw error; }虽然 ArkUI 与 Vue 在某些方面存在相似性,但它们之间有一个显著的差异点。自 Vue 2.x 版本以后,Vue 对响应式绑定的处理变得更加粗犷,限制了更新的精细程度到组件层级,并且融入了 VDOM 的概念以及组件级 DIFF。相比之下,ArkUI 作为声明式 UI 框架,却采取了一种更为“传统”的路径,直接聚焦于细粒度的属性更新绑定,从而在机制上与 Vue 的这一演变形成对比。
▐为什么ArkUI 要抛弃 DIFF?回顾ArkUI官网的描述,它进一步证实了笔者从源码分析中的发现:ArkUI采取了一种策略,从 VDOM DIFF “回撤”到细粒度的更新,以此来优化性能。
ArkUI选择绕过传统的DIFF算法,部分原因可能在于VDOM可能带来的内存消耗及更新延迟问题。它追求更细粒度的更新管理,以提升性能和响应速度。

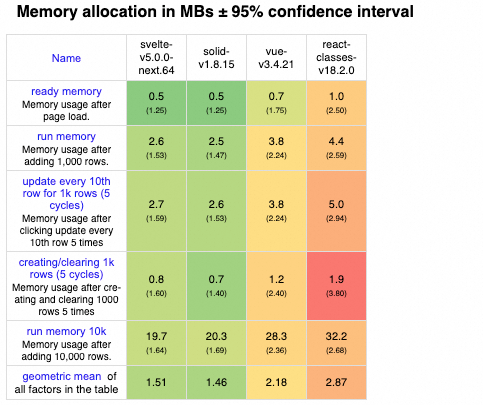
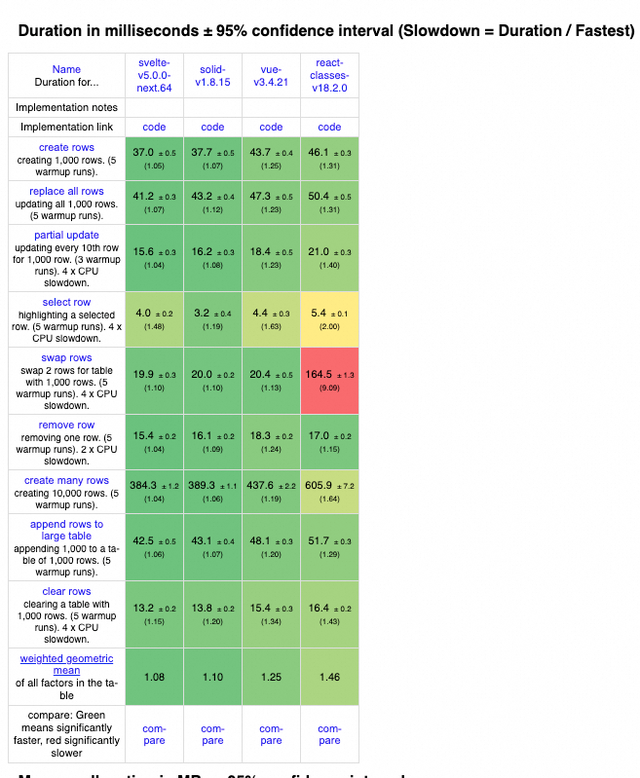
让我们从 js-framework-benchmark 中挑选若干典型框架的测试结果,以此来深入了解VDOM DIFF技术与其他技术路径在内存占用和响应时间上的性能差异。
内存占用从下图中可以看到 Vue 和 React 在内存占用上明显落后 SolidJS 和 Svelte:
 响应时间
响应时间尽管Vue的DIFF过程历经众多策略与细节优化,但在响应时间上,与一些未采用DIFF机制的框架相比较,仍存在差异。
 Vue2.x选用VDOM是否明智?
从性能和跨平台的角度审视,Vue2.x采用虚拟DOM(VDOM)的决策似乎缺乏充分理由。特别是考虑到 Vue3.x 的实验性版本 Vue Vapor Mode(无虚拟DOM模式),它在性能上已展现出不亚于 VDOM 的表现,这进一步引发了 VDOM 必要性的讨论。
 ▐为什么要将声明式的语法平铺?
我们先来看看 SolidJS 的产物。
<div type="button" onClick={increment}> <div>123<div>{count() + 1}</div></div> <div>{count()}</div> </div>var _el$ = _tmpl$(), _el$2 = _el$.firstChild, _el$3 = _el$2.firstChild, _el$4 = _el$3.nextSibling, _el$5 = _el$2.nextSibling; _el$.$$click = increment; _$insert(_el$4, () => count() + 1); _$insert(_el$5, count); return _el$;SolidJS选择了在栈上即时创建较多的临时变量,而非增加堆栈深度,以此来优化运行时性能。它的语法设计允许直观地表达UI结构的嵌套,但实质上并不导致因语法嵌套而引起的堆栈过深问题,从而避免了因堆栈层次过多而导致的不必要的上下文创建与性能开销。
这种做法与ArkUI有相似之处,提示我们在编程实践中应谨慎设计,以减少不必要的抽象层级,防止堆栈深度无谓增加。然而,ArkUI采取了一种不同的策略,它通过堆栈的入栈和出栈来跟踪节点的层次和嵌套结构。值得注意的是,ArkUI为每个组件创建节点时都应用了observeComponentCreation进行包裹,甚至包括那些未使用变量符号标记的节点。从优化角度看,这一做法可能存在过度包装的问题,笔者认为有进一步精简和优化的空间。
▐响应式更新对于响应式的更新,ArkUI 就做的比较简单。下面两段是比较核心的代码:
public set(newValue: T): void { const oldValue = this.wrappedValue_; if (this.setValueInternal(newValue)) { TrackedObject.notifyObjectValueAssignment(/* old value */ oldValue, /* new value */ this.wrappedValue_, this.notifyPropertyHasChangedPU, this.notifyTrackedObjectPropertyHasChanged, this); } }protected notifyPropertyHasChangedPU() { this.owningView_.viewPropertyHasChanged(this.info_, this.dependentElmtIdsByProperty_.getAllPropertyDependencies()); } viewPropertyHasChanged(varName: PropertyInfo, dependentElmtIds: Set<number>): void { this.markNeedUpdate(); for (const elmtId of dependentElmtIds) { this.dirtDescendantElementIds_.add(elmtId); } }在关联的属性变化后 ArkUI 会将当前组件标记为脏组件,并且将属性依赖收集到的dependentElmtids 维护到组件的dirtDescendantElementIds_
在笔者从这里来 AkrUI 的升级并未完全到位,它仍然将响应式流程与组件紧密绑定在一起,未能在框架侧落地无组件(NoComponent)的设计理念。一般而言,节点与组件的绑定是为了给 DIFF 过程设定界限,从而缩小比较范围,提高效率。然而,在当前场景下,这种绑定显得多余。
在updateDirtyElements 消费脏节点,UpdateElement 中获取到updateFuncs中存储的更新函数。
public updateDirtyElements() { do { dirtElmtIdsFromRootNode.forEach(elmtId => { if (this.hasRecycleManager()) { this.UpdateElement(this.recycleManager_.proxyNodeId(elmtId)); } else { this.UpdateElement(elmtId); } this.dirtDescendantElementIds_.delete(elmtId); }); } while (this.dirtDescendantElementIds_.size); }而updateDirtyElements 被 Native的JSView 关联的Node 持有。
auto updateFunction = [weak = AceType::WeakClaim(this)]() -> void { auto jsView = weak.Upgrade(); if (!jsView->needsUpdate_) { return; } jsView->needsUpdate_ = false; jsView->jsViewFunction_->ExecuteRerender(); };customNode->SetUpdateFunction(std::move(info.updateFunc));上文中说到的组件markNeedUpdate最终也会调用到 JSView背后的Node的方案。
bool ViewPartialUpdateModelNG::MarkNeedUpdate(const WeakPtr<AceType>& node){ customNode->MarkNeedUpdate();}最终会将Node注册进入渲染管线PipelineContext 中的脏节点集合中。
void CustomNodeBase::MarkNeedUpdate(){ auto context = PipelineContext::GetCurrentContext(); context->AddDirtyCustomNode(AceType::DynamicCast<UINode>(Claim(this)));}最终渲染管线在接受到系统的 vSync 信号回调后清理脏节点。
void PipelineContext::FlushVsync(uint64_t nanoTimestamp, uint32_t frameCount){ FlushBuild();}void PipelineContext::FlushDirtyNodeUpdate(){ while (!dirtyNodes_.empty()) { for (const auto& node : dirtyNodes) { if (AceType::InstanceOf<NG::CustomNodeBase>(node)) { auto customNode = AceType::DynamicCast<NG::CustomNodeBase>(node); node->needRebuild_ = false; if (node->updateFunc_) { node->updateFunc_(); } } } }}至此,一个基本的响应式流程得以完成。不难发现,ArkUI 的响应式架构及其更新机制,都展现了与市面上成熟响应式框架相似的特质。
工程化▐TypeScript超集"ohos-typescript"通过逆向分析 DevEcoStudio 中的多种插件 Jar 包,我们发现 ArkUI 巧妙地对现有各类语言的插件进行了定制改造,从而在研发环节实现了这一功能的集成。
声明式语法(struct 关键词,@Builder,Component Inside ) 研发侧实现即将符合条件的词法节点转成扩展的语法树,其中扩展了StructDeclartion,EtsComponentExpression,ComponentState等一系列类型(Intellij 中的 PSI ElementType)。IDE 便能得到一个经过精心调整的抽象语法树(AST),为代码导航、语法高亮等高级功能奠定了坚实基础,也解决了开发者对于这门超集语言研发侧的问题。如strcut结构 , ArkUI 即重写了JavaScriptParser 来实现自身的语法分析。
public static boolean structDeclaration(PsiBuilder b, int l) { if (JavaScriptParserUtil.recursion_guard_(b, l, "structDeclaration")) { boolean r2 = r && structDeclaration_1(b, l + 1); boolean r3 = r2 && JavaScriptParserUtil.consumeTokens(b, 1, new IElementType[]{JavaScriptTypes.STRUCT, JavaScriptTypes.IDENTIFIER}); boolean r4 = r3 && etsStructClassBlock(b, l + 1); return r4 || r3;}return false;}DevEcoStudio 的LSP服务其实是继承TypeScriptLanguageServer 进行的,在其中又拓宽了一些自定义的ESLint 规则。整体架构基本和Idea原生JavaScript插件保持一致,通过新起一个Node进程构建LSP协议的通信。
总结来看,在研发侧不管是语言插件还是LSP服务,ArkUI利用许多原有的TypeScript生态能力来包装完成。
▐语法糖处理过程通过上文对于产物的分析,在了解 ArkTS 的编译链路时笔者看到下面的处理方式也就不足为奇,ArkTS 的打包整体由Rollup 完成,其中核心 ets 文件的 loader 也是直接复用了 ts compiler 逻辑,注意这里的 ts 指 ohos-typescript,利用 loader before 的 hook 提前处理好语法糖以及响应式相关的包装。
const result: ts.TranspileOutput = ts.transpileModule(newContent, { compilerOptions: compilerOptions, fileName: id, transformers: { before: [ processUISyntax(null) ] }});同时 ohos-typescript 中还提供扩展了
ts.isStructDeclaration,ts.isEtsComponentExpression节点判断函数的辅助解析这棵超集树。
下面举两个转换的例子:
1. struct Index转变为class Index extends ViewPU
if (ts.isStructDeclaration(node)) { return ts.factory.createClassDeclaration(ts.getModifiers(node), node.name, node.typeParameters, updateHeritageClauses(node, log), memberNode);} ts.factory.createHeritageClause( ts.SyntaxKind.ExtendsKeyword, [ts.factory.createExpressionWithTypeArguments(ts.factory.createIdentifier("ViewPU"), [])]);2. 嵌套语法的平铺过程
本质是一个语法树的递归的遍历过程,通过维护顶层的Statements 按需塞入,来实现平铺。
function processNormalComponent(node: ts.ExpressionStatement,.....): void { const newStatements: ts.Statement[] = []; const res: CreateResult = createComponent(node, COMPONENT_CREATE_FUNCTION); newStatements.push(res.newNode); const etsComponentResult: EtsComponentResult = parseEtsComponentExpression(node); const componentName: string = res.identifierNode.getText(); if (etsComponentResult.etsComponentNode.body && ts.isBlock(etsComponentResult.etsComponentNode.body)) { processComponentChild(etsComponentResult.etsComponentNode.body, innerCompStatements, log, {isAcceleratePreview: false, line: 0, column: 0, fileName: ''}, isBuilder, parent, undefined, isGlobalBuilder, false, builderParamsResult); }}▐调适能力ArkTS 语言的调试功能依托于 arkcompiler_ets_runtime 虚拟机来实现,与传统依赖“插桩”等技术的调试方式不同,解释器虚拟机往往采取了一种更为轻量级的处理策略。具体到实现细节,让我们深入了解其如何巧妙地干预字节码操作符执行以实现断点功能。
在虚拟机运行的核心流程RunInternal方法内部,当系统处于调试模式下,会转向一个特殊的调度表。这一转换旨在让原本的操作符执行路径受一个新的、专为调试设计的路由控制。在此机制下,系统不仅能灵活地管理操作符的执行流向,还会检查当前操作符是否触发了预设的断点条件,从而精确控制程序的暂停与继续执行,整个过程流畅而高效。
void EcmaInterpreter::RunInternal(JSThread *thread, const uint8_t *pc, JSTaggedType *sp){ uint8_t opcode = READ_INST_OP(); auto *dispatchTable = instDispatchTable.data(); // 在调试模式下切换到一张新的OP Debug路由表 CHECK_SWITCH_TO_DEBUGGER_TABLE(); goto *dispatchTable[opcode];}DEBUG_HANDLE_OPCODE(LDNAN){ NOTIFY_DEBUGGER_EVENT(); REAL_GOTO_DISPATCH_OPCODE(EcmaOpcode::LDNAN);}DEBUG_HANDLE_OPCODE(LDINFINITY){ NOTIFY_DEBUGGER_EVENT(); REAL_GOTO_DISPATCH_OPCODE(EcmaOpcode::LDINFINITY);}不同于其他虚拟机通常将调试模块内置, ArkTS 选择把调试模块利用 napi(ets_runtime的扩展注册机制) 注入进入虚拟机中,将调试交互协议的具体实现放在 arkcompiler_toolchain 项目,让 ets_runtime 也可以轻装上阵。
发起BreakCommand即开发者在面板侧选择某一行进行断点,这一信息会被记录在虚拟机容器中。
在这里笔者还发现 ets_runtime 调试模块 原生支持 Chrome Debug Protocol 协议,为了适配 Intellij 生态做了一层 DAP 和 CDP 的协议交换,可能最初的设计是面向其他研发的场景。
int DebuggerClient::BreakCommand(){ std::unique_ptr<PtJson> request = PtJson::CreateObject(); request->Add("id", id); request->Add("method", "Debugger.setBreakpointByUrl"); std::unique_ptr<PtJson> params = PtJson::CreateObject(); params->Add("columnNumber", breakPointInfoList_.back().columnNumber); params->Add("lineNumber", breakPointInfoList_.back().lineNumber); params->Add("url", breakPointInfoList_.back().url.c_str()); request->Add("params", params); std::string message = request->Stringify(); session->ClientSendReq(message)}bool JSDebugger::SetBreakpoint(const JSPtLocation &location, Local<FunctionRef> condFuncRef){ std::unique_ptr<PtMethod> ptMethod = FindMethod(location); auto [_, success] = breakpoints_.emplace(location.GetSourceFile(), ptMethod.release(), location.GetBytecodeOffset(), Global<FunctionRef>(ecmaVm_, condFuncRef)); return true;}落入Break运行字节码映射到设置的节点。
ets_runtime 遇到断点映射到操作符会让虚拟机进入一种“空转”状态,期间不断接收并执行新的调试指令,这一机制与其他虚拟机的实现方法相似。
void JSDebugger::BytecodePcChanged(JSThread *thread, JSHandle<Method> method, uint32_t bcOffset){ if (!HandleStep(method, bcOffset)) { HandleBreakpoint(method, bcOffset); } } bool JSDebugger::HandleBreakpoint(JSHandle<Method> method, uint32_t bcOffset){ auto breakpoint = FindBreakpoint(method, bcOffset); if (hooks_ == nullptr || !breakpoint.has_value()) { return false; } JSPtLocation location {method->GetJSPandaFile(), method->GetMethodId(), bcOffset, breakpoint.value().GetSourceFile()}; hooks_->Breakpoint(location); return true;}void ProtocolHandler::ProcessCommand(){ do { { std::unique_lock<std::mutex> queueLock(requestLock_); if (requestQueue_.empty()) { if (!waitingForDebugger_) { return; } requestQueueCond_.wait(queueLock); } requestQueue_.swap(dispatchingQueue); } isDispatchingMessage_ = true; while (!dispatchingQueue.empty()) { std::string msg = std::move(dispatchingQueue.front()); dispatchingQueue.pop(); [[maybe_unused]] LocalScope scope(vm_); auto exception = DebuggerApi::GetAndClearException(vm_); dispatcher_.Dispatch(DispatchRequest(msg)); DebuggerApi::SetException(vm_, exception); } isDispatchingMessage_ = false; } while (true);}结语本文通过对HarmonyOS ArkUI的介绍与分析,探讨了其作为声明式开放框架的核心特性和实现机制。而ArkUI作为HarmonyOS的声明式UI框架,通过独特的设计思路与实现方式,旨在为开发者提供高效、灵活的跨平台界面开发解决方案。

团队介绍
我们是淘天集团-商家&开放平台技术前端团队,本团队负责商家平台建设并围绕淘宝电商B2C业务,提供商家应用开放能力,为阿里小程序开发者生态提供高生产力工程化技术产品,打造面向B端的桌面/IoT小程序基础设施,助力商家规模化增长。
