半年前,我从13600K换成了14900K,而且我还不自量力的用360水冷压出场即灰烬的i9-14900K……
根本压不住,Z790板供电再强、超频潜力再厉害与我何干?
Bye, Z790.
Hi, B760:
不想折腾,索性换成新款华硕小吹雪s了(ROG STRIX B760-G GAMING WIFI S),以前的顺带着回点儿血。
这次,我通过小吹雪s主板的降压功能,成功的让我的i9在尽可能不降低性能的情况下,大幅降低发热和功耗,以换取更稳定的峰值性能,免得在我渲染时总是撞温度墙。

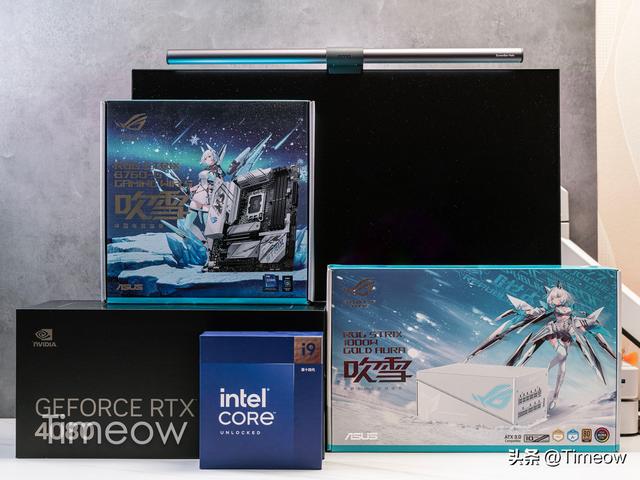
今天,就和大家分享一下,我这一套较为合理的MATX生产力主机装机搭配,它不仅有更稳定的性能释放,也有黑白配的超高颜值。如果你感兴趣的话,不妨一看:
注,此套搭配中的处理器,也可以换成更合理的i7-14700K。
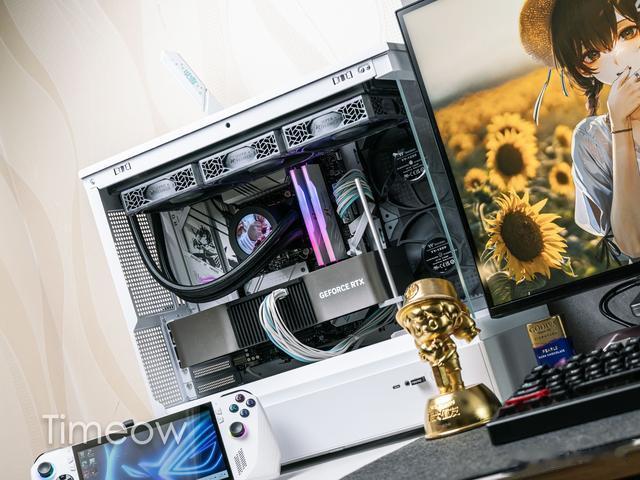
先来看整机效果
这一套的RGB元素不够浓,主要是它是用来干活儿的,RGB太多就会干扰到我。而且我配备的几款风扇,都非常强力,整体凸显一个黑白配的专业范。
具体配置如下:
CPU:英特尔酷睿i9-14900K
主板:华硕ROG STRIX B760-G GAMING WIFI 小吹雪S
显卡:英伟达RTX480 Founders Edition
硬盘:希捷酷鱼530 2TB(主系统+游戏盘),希捷酷玩520 1TB(素材盘)
内存:金百达24GBx2 DDR5 6800MT/s
电源:华硕 ROG STRIX 吹雪1000W 金牌全模组电源
机箱:爱国者星璨岚M-ATX 270°海景房
散热器:
Tt TOUGHLIQUID Ultra 360 一体式水冷CPU散热器(原装风扇装机箱上了)
振华MEGACOOL巨风12cm机箱风扇(装在水冷上了)
这一套,个人感觉特别适合刚需i9性能、但又不愿意或不能折腾的玩家。
选择B760主板,舍弃之前的Z790,就是因为现在的14代i9没法超频了,且默频就很夸张,所以像我一样用B760板+降压,在不折腾的前提下,可以达到和Z790主板差不多一样的体验。
先来看
主板华硕ROG STRIX B760-G GAMING WIFI S (AKA“小吹雪s”)主板方面,我加大了二次元浓度……选的是华硕ROG STRIX B760-G GAMING WIFI S(好长的名字),简称小吹雪s。

这块板子是黑银配的风格,RO姬“SE7EN”的形象非常显眼。大面积的银白色散热“装甲”颜值着实酷炫。

黑色的2盎司铜六层PCB,在稳定性&电气性能和强度上都有保障。
回到正面
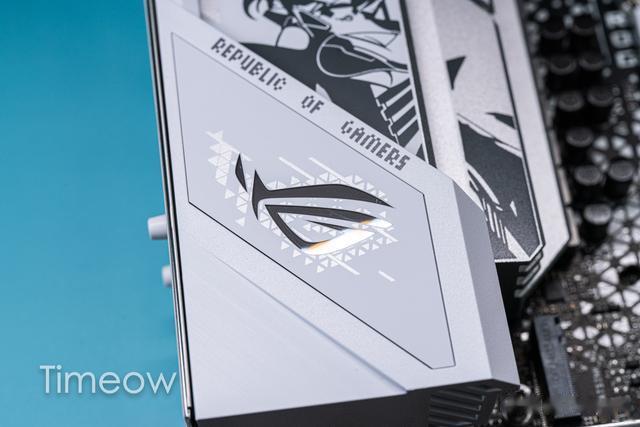

RO姬下方是通电会亮的败家之眼logo,信仰值拉满咯。

用料非常厚道的金属装甲,还设置了多个凹槽,酷炫之余也增加了散热面积。

处理器周围散热装甲下方,是小吹雪s的12+1+1供电模组,完全带的动不超频的i9-14900K了。

除了供电部分,小吹雪s还在两个M2硬盘位提供了两块金属散热装甲。
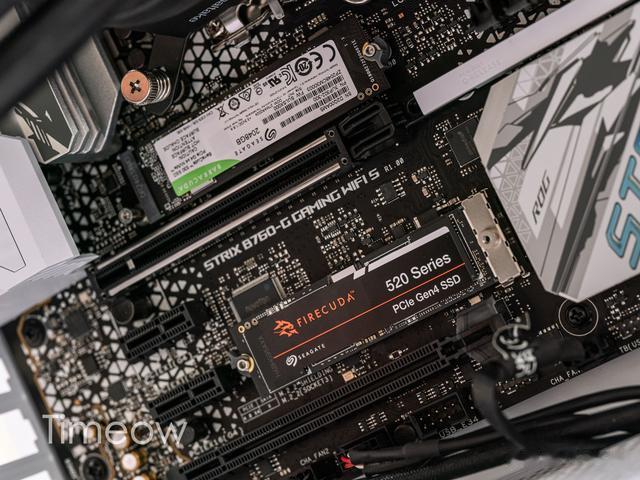
靠它俩,我的两根SSD都能稳定运行。

PCH芯片组上,也使用了高颜值的散热装甲设计,彩色的立体STRIX logo也异常酷炫。
然后,我要隆重介绍一下它的显卡易拆键。
以往的主板想要拆显卡,必须要用手指或螺丝刀用力顶住显卡固定“跷跷板”,才能将显卡金手指弹出,费力不说,更有戳坏主板元器件的风险。

小吹雪s配备的这个显卡易拆键,将固定显卡的部位做成了弹簧结构,在远处按压即可弹出显卡金手指,用起来着实方便了。
接着,来看小吹雪s豪华的接口配置:
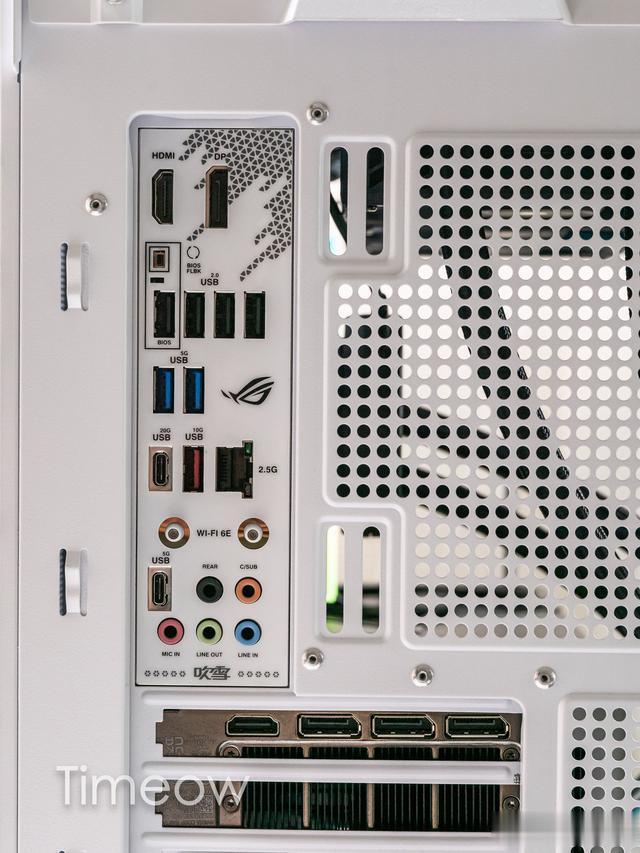
从左到右、从上到下:
HDMI、DP、
4个USB 2.0、
2个USB 3.0(5Gbps)、
USB-C(20Gbps)、USB-A(10Gbps)、2.5G网口、
WiFi 6E易拆式天线接口、
USB-C(5Gbps)、
音频接口。
接口不仅多,而且还很丰富。其中,第一个USB 2.0支持BIOS FlashBack,可以通过上方的小按钮,来备份、恢复、更新BIOS,特别适合超频玩家折腾。
再来看扩展接口,
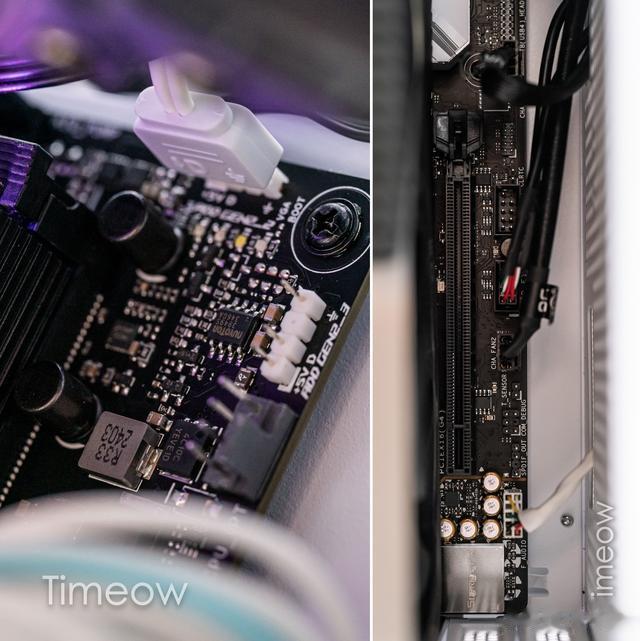
虽然它是MATX,但该有的接口它都有了,包括支持AURA神光同步的RGB接口、雷电4插针、USB扩展插针等,主流外设和配件都能连得上。
另外,要特别注意这两个接口:CPU_FAN和AIO_PUMP。

在用螺丝固定水冷冷排前,先把水冷风扇和冷头的两条线连上,因为大概率水冷冷排会挡住这两个接口。我装机累计也有10多台了,但凡遇到水冷,总是会犯同样的错。犯错后,就得拆了冷排再来一次……

裸板上机箱的效果↑

总之呢,这款小吹雪s B760板子,整体非常符合我的需求、也符合我的审美,人性化的M2散热器、显卡易拆键都很贴心,超大规模的散热装甲也让它有了十足的稳定性,是一块儿好板子!
接着再来看
CPU和显卡i9-14900K
没啥好说的,这个连功耗都控制不好的U,真的让人又爱又恨。
首发4799入手,建议别买,换成i7-14700K更合理。
英伟达公版RTX 4080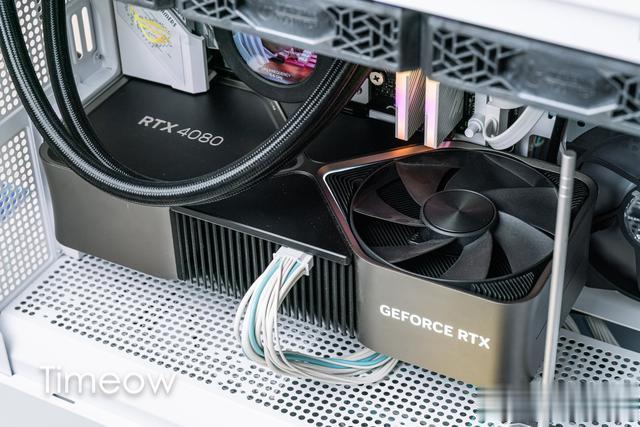
一年前选择公版,其实还是因为喜欢这种金属质感。它可以融入到任何机箱里而不突兀,很百搭。
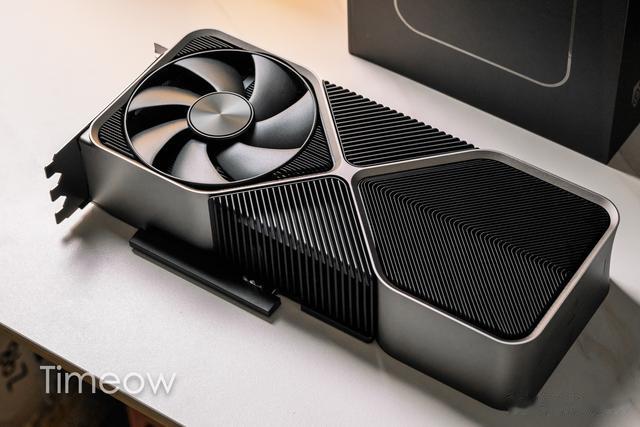
它的散热模组和4090是一致的,无论冬天夏天,都能应对满载状态,并且噪音也是真的低。
性能方面,我就不废话了,够我用。
另外,这张卡我当时花9499买的,几个月后4080s出来后只卖8000多,冤大头就是我咯~
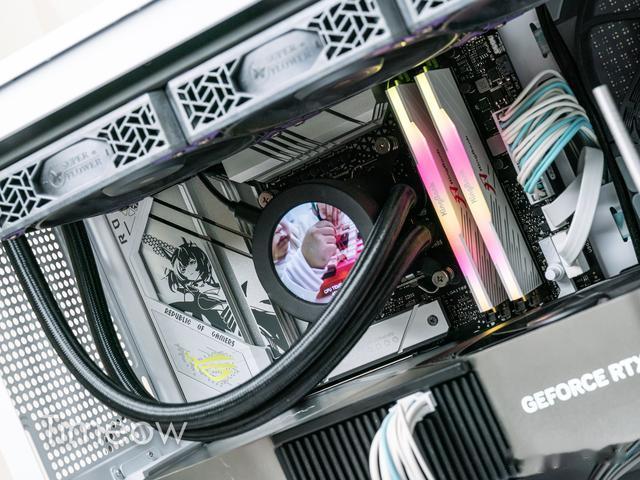
内存金百达 白刃RGB灯条 DDR5 6800 48GB(24GBX2)套装
对我来说,这套内存最大的特点是48G大容量+稳定又强力的海力士M-DIE颗粒,而且它的价格也不贵,618期间促销价999元/一套,相比我的处理器来说就是个零头啊~
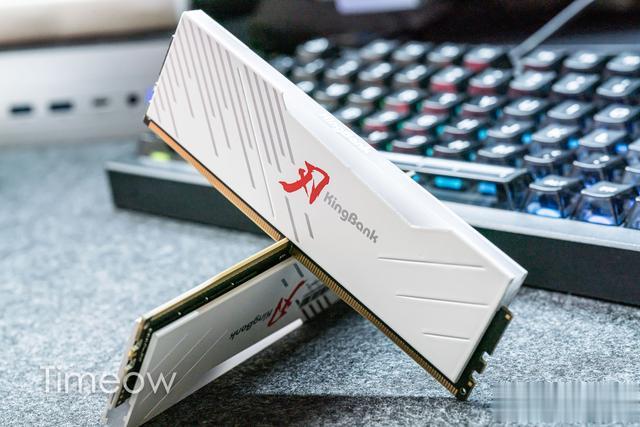
金百达白刃和主板的风格很搭,这款内存表面的2毫米厚全白散热装甲另其整体重量来到了63.6克。

这样的散热装甲不仅用料厚实、好看,配合其工业级的散热硅脂,达到了绝佳的长期散热效果。

再加上10层强化PCB板,不仅厚实、耐用,而且电路设计更宽松、电气性能也有保证。
它的内部使用了来自SK海力士的原厂原印M-Die颗粒,每颗3GB,单面排列8颗、组成24GB的容量。M-Die在品质上约等同于同门A-Die,都属于DDR5时代里顶级的内存颗粒,在稳定性、超频潜力上潜质很强。
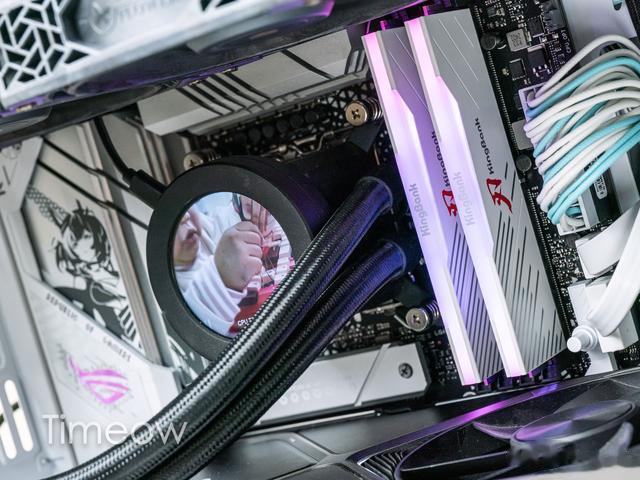
上机点亮后,RGB效果非常出色
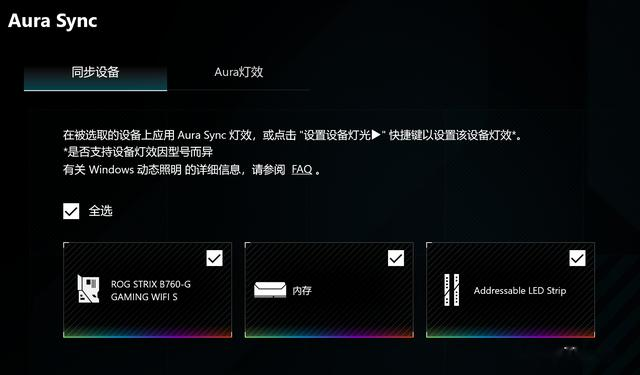
而且它支持包括华硕Aura在内的多家厂商神光同步,可玩性极高。

实测在6800MT/s下可以稳定运行而不崩,作为性价比款大容量D5内存来说,实在是难得。
它在XMP 6800MT/s下,读写性能就破100GB/s了,对我来说,6800MH/s足够我用。我感受不到在Blender渲染时、玩使命召唤时,更高频率的差别。但华硕这块儿小吹雪s,对内存的超频支持很好、兼容性也是一等一的,所以直接在主板里折腾了一下,7200MT/s顺利达成并正常运行,跑分如下:

读写跑分均接近110GB/s大关,延迟也进一步降低了2.1ns。
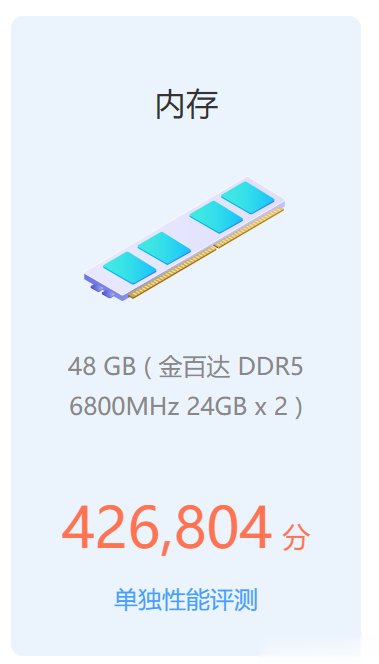
同时,鲁大师的内存跑分也来到了约42.7万,相当厉害啊~

这款48GB的金百达刃RGB灯条套装性能表现相当不错,超频后7200MT/s也算是很顶级了,如果你愿意折腾一下,这块主板让它上8000MT/s以上不是梦。
这样的内存,我是非常非常满意了~
硬盘
我直接从原来的电脑上拔下了两根SSD,希捷酷鱼530 2TB和希捷酷玩520 1TB。数据还是原来的数据,连系统都没有重装,插上就能用,系统和主板“握手”后,自动下载了小吹雪s的驱动和控制软件,真的是太方便了。
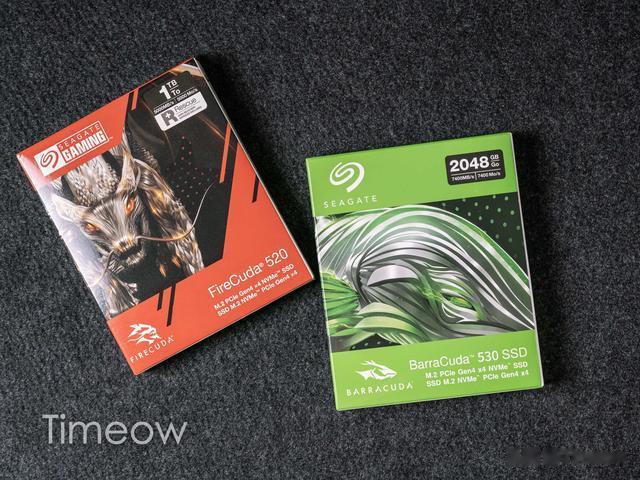
扯远了,两个盘的性能,都是PCIe4.0高端水准,他们都用了高品质的TLC颗粒,兼具高寿命和高性能,所以希捷针对这两款SSD,都提供了5年质保,1TB的版本600TBW质保写入量,2TB版本则是1200TBW。
接下来,简单聊一下:
2T的希捷酷鱼530
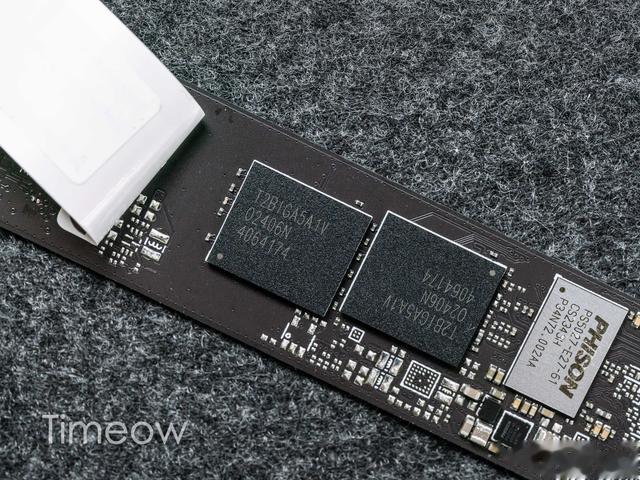
使用了东芝的BiCS6:162层3D NAND TLC颗粒。
作为系统和游戏盘,读条速度非常快,体验很顶级,不愧定位为电竞专家疾速SSD;
具体跑分可参考:

CDM8的SSD测速中,530它跑出了7050.848MB/s和6583.73MB/s的超高成绩。要不是因为Intel平台的限速,理论上会更高。

Fastcopy传输一个35G视频文件到希捷酷鱼530上,平均速度为5700MB/s,表现是这个档次SSD里的超顶级水准了。
1T的希捷520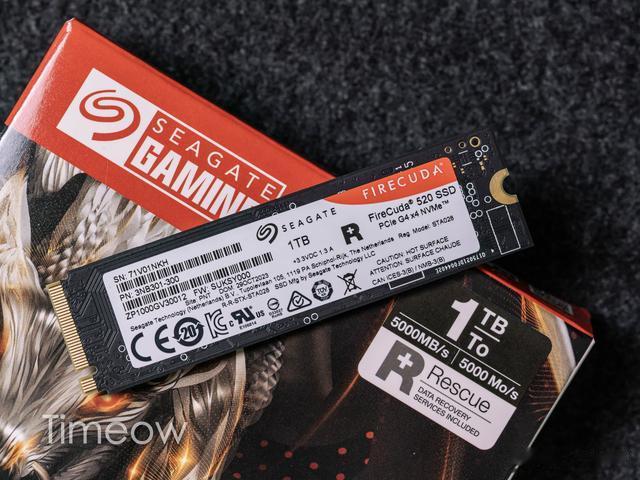
而另一个1T的希捷520,则使用了颗粒编号为HABHG95AXA、来自SK hynix(海力士)的176层3D NAND TLC颗粒。性能杠杠的!
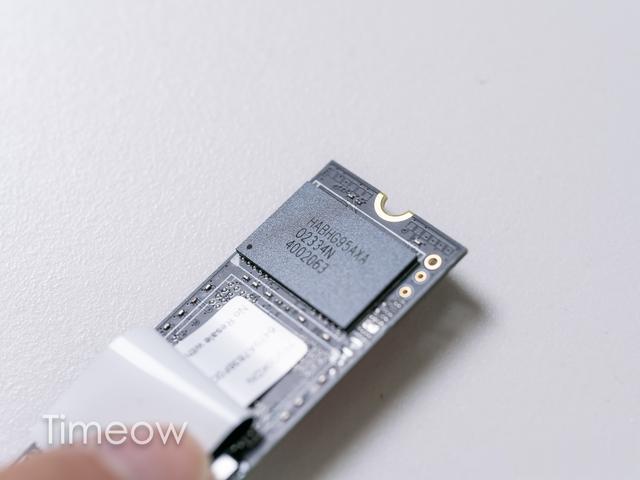
作为照片编辑暂存盘,Lr直接在上面读取导出RAW照片的体验非常丝滑,毫无性能瓶颈。
它的性能跑分可参考:

CDM8的SSD测速中,它跑出了5210.8MB/s和4844.65MB/s的成绩,小超标称值。
而且单线程4K随机写入速度395.42MB/s,也是同级别产品里最强的那一档,比280MB/s、330MB/s的强多啦。

Fastcopy传输一个35G视频文件到希捷酷玩520上,平均速度为4836MB/s,表现是5000MB/s读速档次的SSD里非常高的水准了。
如果你刚需SSD,在618期间买希捷酷玩520就挺好,1TB容量卖399,实在是划算!
以上两个盘的容量,对我来说足足用了。如果还不够,我还有NAS。
说了这么多,差点把电源给遗漏了
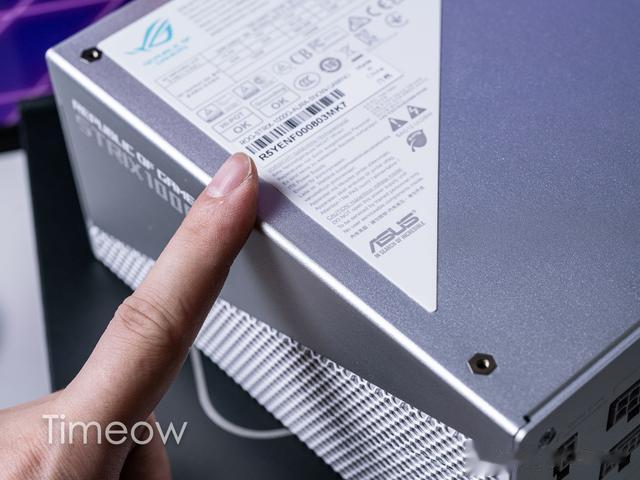
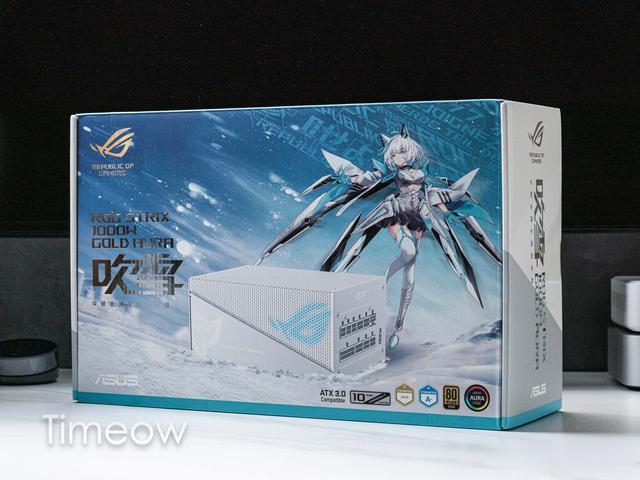
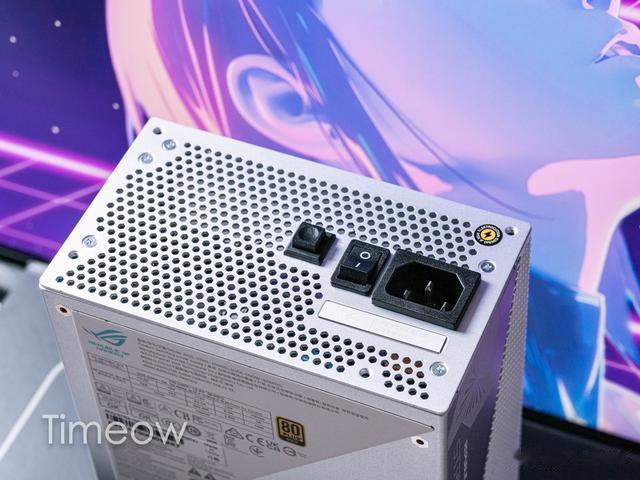
电源ROG STRIX 吹雪1000W 金牌全模组电源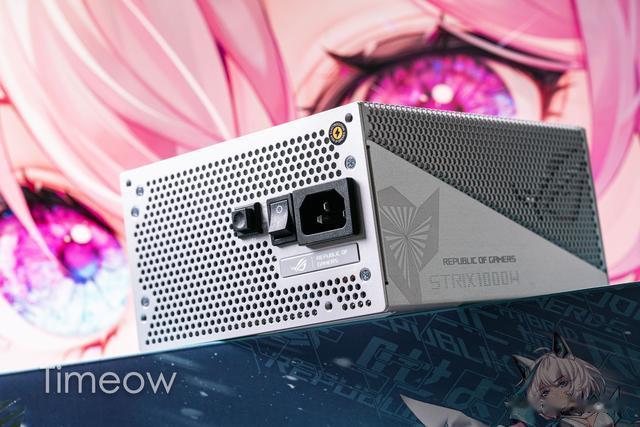
同样的,这次我用的是和主板同门的华硕吹雪1000W金牌全模组电源。
理由无他,我就喜欢这铝合金外壳质感——
以及蓝白配色的软软压纹线↑

这个软软压纹线理起来是真舒服,远非其他产品硬邦邦的线材可比。
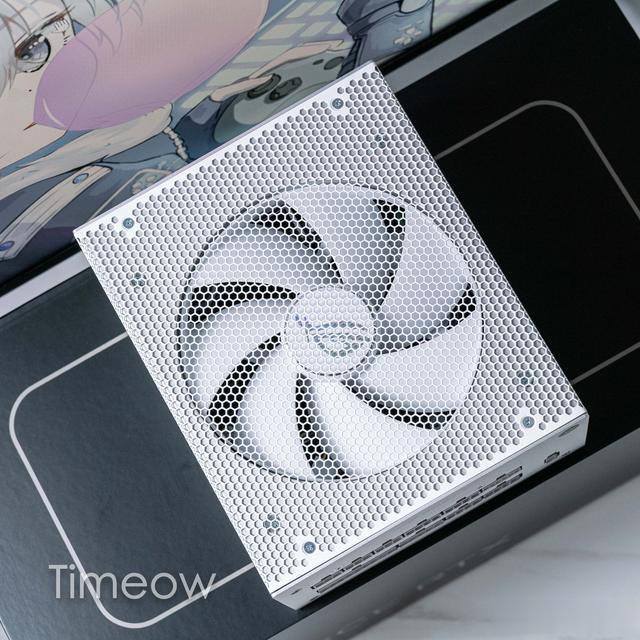
它整体是全铝金属原色+白色搭配,看起来高端又漂亮啊。

两侧边的败家之眼logo自带RGB↓
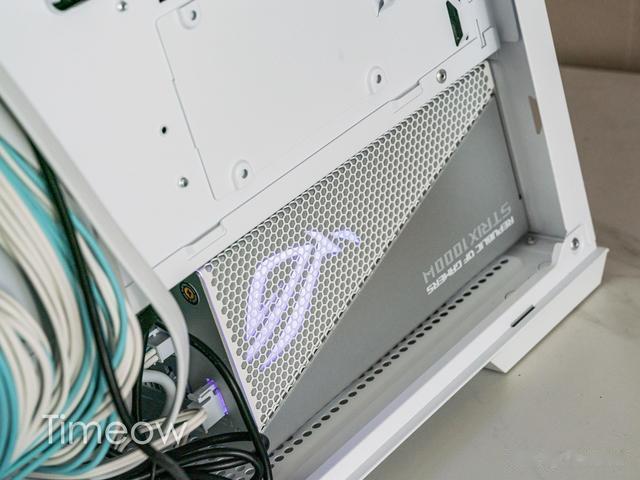
RGB支持华硕的AURA Sync神光同步,很适合全白透明海景房方案的PC搭建。
在性能上,它支持ATX3.0,可以更好的应对显卡的瞬时功耗(Power Spike)。
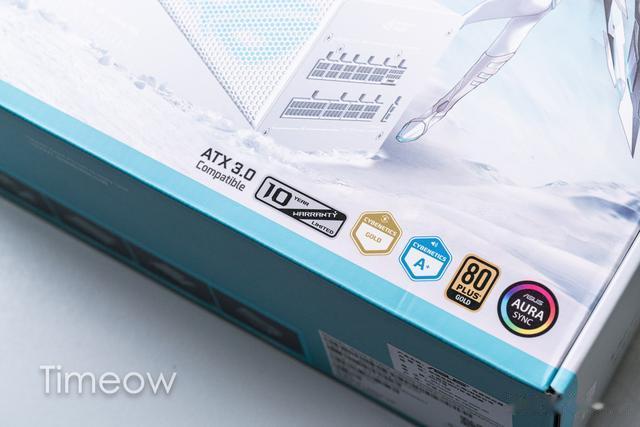
80PLUS金牌认证,在220V电压、50%负载下,可以达到91.5%的转换效率,日常低负载和满负荷的时候也有89%以上的转换效率,比金牌认证标准高了不少、已经基本等同于白金级别了。不仅节能,而且也反应了内部用料设计相当不错~这也是它10年质保的底气所在吧~

在设计和用料上的优势,可以让吹雪这款电源在0.1~100毫秒内应对来自显卡和CPU最高两倍的瞬时功耗,最高可以达到这种状况持续时间的10倍,用起来毫无后顾之忧了。

原生PCIE5.0接口可以直接给40系显卡供电,最高600W妥妥的,上i7+4090是没问题的。用在我的i9+4080也是绰绰有余。

它附带的12 VHPWR线材,原生16 pin插口,上面有写600W字样,单线材支持额定600W的电力传输、无需6+2pin转接线。
另外,它在电源负载低于60%时,依靠内部的大面积大体积散热模块自然散热,风扇停转也能稳定输出,日常工作追求静音的话,这个是真合适!
即使高负载下,高寿命的双滚珠轴流风扇声音也不大,被CPU散热器盖过是妥妥的。

请原谅我的理线能力,我眼不见为净……
接下来,给大家聊聊,如何让i9-14900K降压稳定工作吧。
华硕主板 如何给13/14代Intel CPU降压?更新BIOS首先,要确认你的主板是否更新了最新的BIOS,如果没有的话,去搜索一下主板厂商的服务支持。

我的华硕板子,可以直接搜索“华硕支持”,在华硕官网搜索ROG STRIX B760-G GAMING WIFI S,找到并下载它的BIOS。需要注意的是,如果你不想被Intel坑,就别下描述里有Intel Baseline Profile option字样的BIOS版本。

我下载的是1645版本,供参考。
随后装到U盘里,插到电脑上,重启,按DEL键进入BIOS。

按F7,进入高级模式,在工具里,选择“华硕升级BIOS应用程序3”

点击U盘里的BIOS升级文件,按照指引照做即可。
升级完成后,即可继续降压设置:
具体降压设置其实超简单,只需要修改两个地方即可:
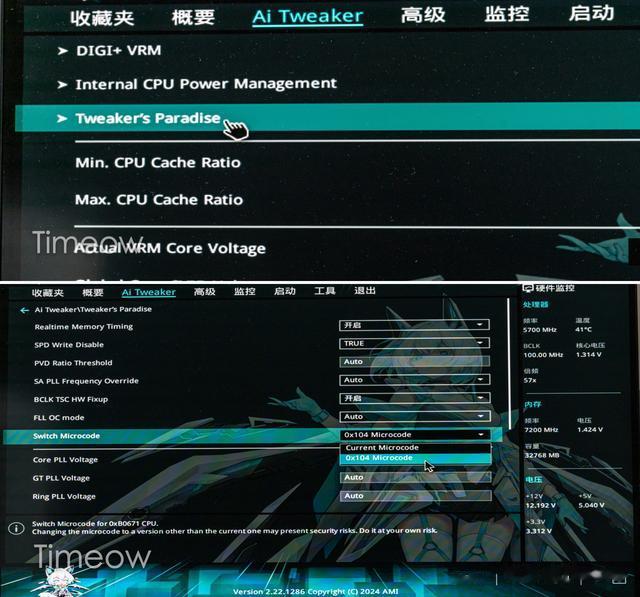
进入BIOS后,按F7进入高级模式,进入到Ai Tweaker>Tweaker's Paradise,在Switch Microcode选项里,选择0x104 Microcode。
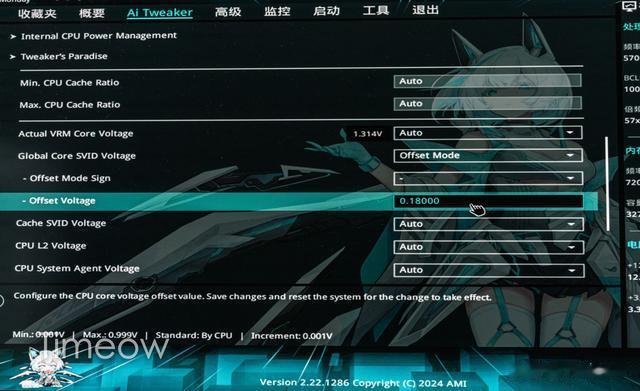
随后,Esc返回上一级,在Ai Tweaker里,点击Global Core SVID Voltage,选择Offset Mode;
点击Offset Mode Sign,选择“-”(如果是“+”号,相当于给CPU加压,万一CPU扛不住,当场挺给你看就悲剧了。)
点击Offset Voltage,点击一下Auto,手动输入一个降压数值,单位是V(福特),个人建议在0.08-0.2之间输入。注意,一开始不要太激进,从0.08开始,免得奔溃蓝屏进不去系统,我最后成功降了0.18V,整机也能稳定运行。
接下来看
降压后,跑分
Cinebench R23的跑分为37198,与半年前刚买来14900K时标准模式下的36346分相比↓

现在,给14900K降压后,分数还高出了一些,看来降压后更稳定了呀。
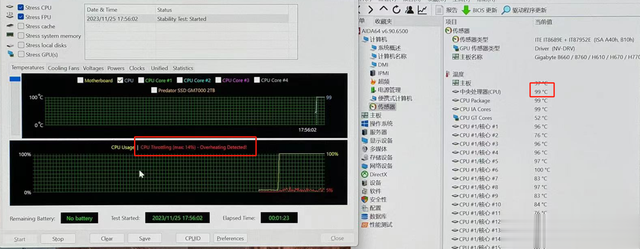
降压后,Prime95烤CPU的功耗与温度降压前↓
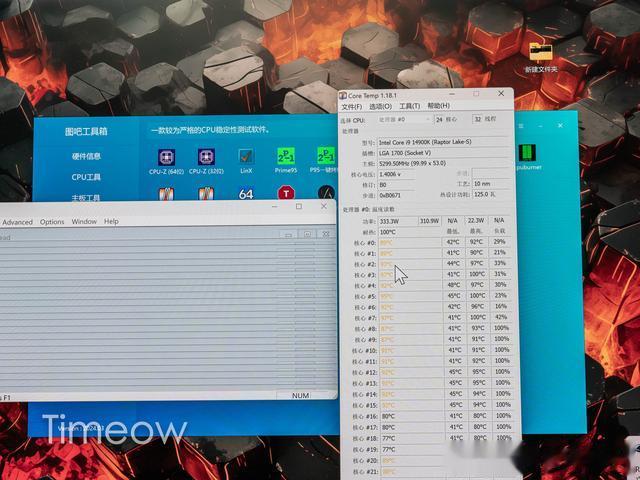
同样的主板,14900K跑到了330瓦以上。再看负载,好多个核心都没有跑满,说明温度太高导致降频了。
温度直飚99℃!
且没降下来过。
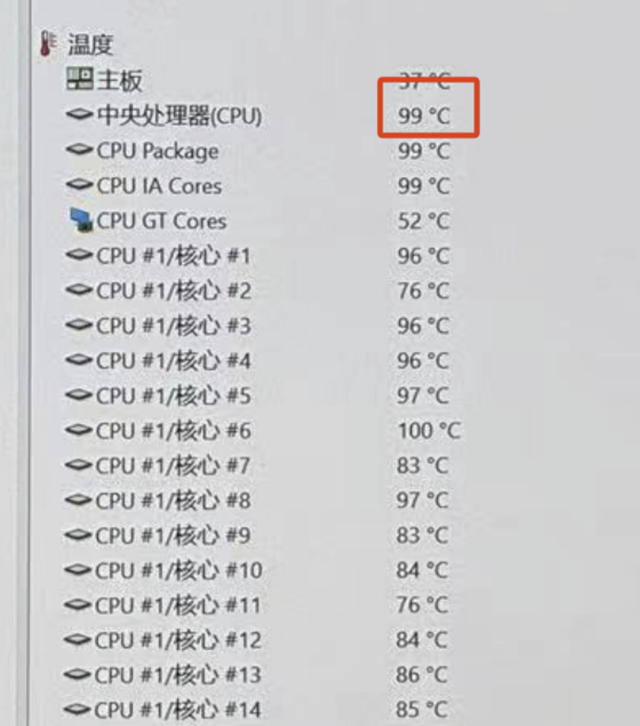
降压后:
CPU核心温度在90摄氏度左右、功耗在270-290瓦。

看来ROG小吹雪主板稳定造诣不是吹的,降压后,CPU更稳了:功耗低了、发热低了、性能却没有肉眼可见的变化,即使CPU降频,也比之前强太多。
你学废了吗?
最后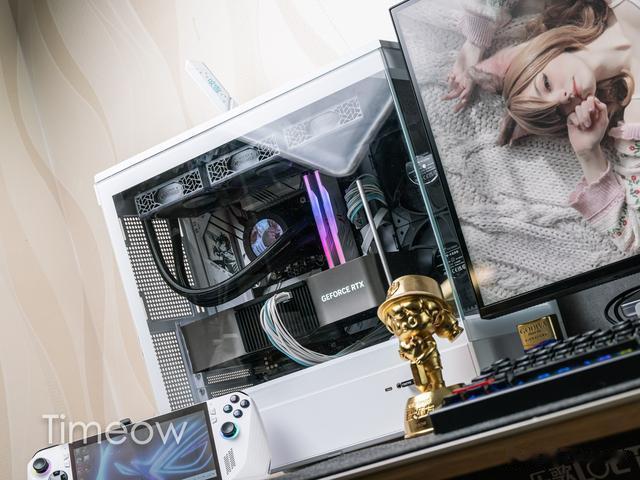
这就是我14900K的最终归宿,换了小吹雪B板后,CPU跑的更稳了,同时也断了我超频的心,安安心心的用电脑得了,别整那些没用的。

如果你近期有装机打算,不妨可以参考一下我的搭配,这一套特别适合生产力、4K游戏。如果追求更强游戏性能,就选4090显卡。总之,我这一套不会错的~
谢谢各位的阅读,下次再见咯~