在 Vue2 中, 0bject.defineProperty 会改变原始数据,而 Proxy 是创建对象的虚拟表示,并提供 set 、get 和 deleteProperty 等处理器,这些处理器可在访问或修改原始对象上的属性时进行拦截,有以下特点∶
不需用使用 Vue.$set 或 Vue.$delete 触发响应式。全方位的数组变化检测,消除了Vue2 无效的边界情况。支持 Map,Set,WeakMap 和 WeakSet。Proxy 实现的响应式原理与 Vue2的实现原理相同,实现方式大同小异∶
get 收集依赖Set、delete 等触发依赖对于集合类型,就是对集合对象的方法做一层包装:原方法执行后执行依赖相关的收集或触发逻辑。说说你对slot的理解?slot使用场景有哪些一、slot是什么在HTML中 slot 元素 ,作为 Web Components 技术套件的一部分,是Web组件内的一个占位符
该占位符可以在后期使用自己的标记语言填充
举个栗子
<template id="element-details-template"> <slot name="element-name">Slot template</slot></template><element-details> <span slot="element-name">1</span></element-details><element-details> <span slot="element-name">2</span></element-details>template不会展示到页面中,需要用先获取它的引用,然后添加到DOM中,
customElements.define('element-details', extends HTMLElement { constructor() { super(); const template = document .getElementById('element-details-template') .content; const shadowRoot = this.attachShadow({mode: 'open'}) .appendChild(template.cloneNode(true)); }})在Vue中的概念也是如此
Slot 艺名插槽,花名“占坑”,我们可以理解为solt在组件模板中占好了位置,当使用该组件标签时候,组件标签里面的内容就会自动填坑(替换组件模板中slot位置),作为承载分发内容的出口
二、使用场景通过插槽可以让用户可以拓展组件,去更好地复用组件和对其做定制化处理
如果父组件在使用到一个复用组件的时候,获取这个组件在不同的地方有少量的更改,如果去重写组件是一件不明智的事情
通过slot插槽向组件内部指定位置传递内容,完成这个复用组件在不同场景的应用
比如布局组件、表格列、下拉选、弹框显示内容等
使用vue渲染大量数据时应该怎么优化?说下你的思路!分析
企业级项目中渲染大量数据的情况比较常见,因此这是一道非常好的综合实践题目。
回答
在大型企业级项目中经常需要渲染大量数据,此时很容易出现卡顿的情况。比如大数据量的表格、树处理时要根据情况做不同处理:可以采取分页的方式获取,避免渲染大量数据vue-virtual-scroller (opens new window)等虚拟滚动方案,只渲染视口范围内的数据如果不需要更新,可以使用v-once方式只渲染一次通过v-memo (opens new window)可以缓存结果,结合v-for使用,避免数据变化时不必要的VNode创建可以采用懒加载方式,在用户需要的时候再加载数据,比如tree组件子树的懒加载还是要看具体需求,首先从设计上避免大数据获取和渲染;实在需要这样做可以采用虚表的方式优化渲染;最后优化更新,如果不需要更新可以v-once处理,需要更新可以v-memo进一步优化大数据更新性能。其他可以采用的是交互方式优化,无线滚动、懒加载等方案scoped样式穿透scoped虽然避免了组件间样式污染,但是很多时候我们需要修改组件中的某个样式,但是又不想去除scoped属性
使用/deep/<!-- Parent --><template><div>使用两个style标签<!-- Parent --><template><div>Vue中v-html会导致哪些问题可能会导致 xss 攻击v-html 会替换掉标签内部的子元素let template = require('vue-template-compiler'); let r = template.compile(`<div v-html="'<span>hello</span>'"></div>`) // with(this){return _c('div',{domProps: {"innerHTML":_s('<span>hello</span>')}})} console.log(r.render);// _c 定义在core/instance/render.js // _s 定义在core/instance/render-helpers/index,jsif (key === 'textContent' || key === 'innerHTML') { if (vnode.children) vnode.children.length = 0 if (cur === oldProps[key]) continue // #6601 work around Chrome version <= 55 bug where single textNode // replaced by innerHTML/textContent retains its parentNode property if (elm.childNodes.length === 1) { elm.removeChild(elm.childNodes[0]) } }如果让你从零开始写一个vuex,说说你的思路思路分析
这个题目很有难度,首先思考vuex解决的问题:存储用户全局状态并提供管理状态API。
vuex需求分析如何实现这些需求回答范例
官方说vuex是一个状态管理模式和库,并确保这些状态以可预期的方式变更。可见要实现一个vuex要实现一个Store存储全局状态要提供修改状态所需API:commit(type, payload), dispatch(type, payload)实现Store时,可以定义Store类,构造函数接收选项options,设置属性state对外暴露状态,提供commit和dispatch修改属性state。这里需要设置state为响应式对象,同时将Store定义为一个Vue插件commit(type, payload)方法中可以获取用户传入mutations并执行它,这样可以按用户提供的方法修改状态。 dispatch(type, payload)类似,但需要注意它可能是异步的,需要返回一个Promise给用户以处理异步结果实践
Store的实现:
class Store { constructor(options) { this.state = reactive(options.state) this.options = options } commit(type, payload) { this.options.mutations[type].call(this, this.state, payload) }}vuex简易版
/** * 1 实现插件,挂载$store * 2 实现store */let Vue;class Store { constructor(options) { // state响应式处理 // 外部访问: this.$store.state.*** // 第一种写法 // this.state = new Vue({ // data: options.state // }) // 第二种写法:防止外界直接接触内部vue实例,防止外部强行变更 this._vm = new Vue({ data: { $$state: options.state } }) this._mutations = options.mutations this._actions = options.actions this.getters = {} options.getters && this.handleGetters(options.getters) this.commit = this.commit.bind(this) this.dispatch = this.dispatch.bind(this) } get state () { return this._vm._data.$$state } set state (val) { return new Error('Please use replaceState to reset state') } handleGetters (getters) { Object.keys(getters).map(key => { Object.defineProperty(this.getters, key, { get: () => getters[key](this.state) }) }) } commit (type, payload) { let entry = this._mutations[type] if (!entry) { return new Error(`${type} is not defined`) } entry(this.state, payload) } dispatch (type, payload) { let entry = this._actions[type] if (!entry) { return new Error(`${type} is not defined`) } entry(this, payload) }}const install = (_Vue) => { Vue = _Vue Vue.mixin({ beforeCreate () { if (this.$options.store) { Vue.prototype.$store = this.$options.store } }, })}export default { Store, install }验证方式
import Vue from 'vue'import Vuex from './vuex'// this.$storeVue.use(Vuex)export default new Vuex.Store({ state: { counter: 0 }, mutations: { // state从哪里来的 add (state) { state.counter++ } }, getters: { doubleCounter (state) { return state.counter * 2 } }, actions: { add ({ commit }) { setTimeout(() => { commit('add') }, 1000) } }, modules: { }})参考 前端进阶面试题详细解答
Vue与Angular以及React的区别?Vue与AngularJS的区别Angular采用TypeScript开发, 而Vue可以使用javascript也可以使用TypeScriptAngularJS依赖对数据做脏检查,所以Watcher越多越慢;Vue.js使用基于依赖追踪的观察并且使用异步队列更新,所有的数据都是独立触发的。AngularJS社区完善, Vue的学习成本较小Vue与React的区别相同点:
Virtual DOM。其中最大的一个相似之处就是都使用了Virtual DOM。(当然Vue是在Vue2.x才引用的)也就是能让我们通过操作数据的方式来改变真实的DOM状态。因为其实Virtual DOM的本质就是一个JS对象,它保存了对真实DOM的所有描述,是真实DOM的一个映射,所以当我们在进行频繁更新元素的时候,改变这个JS对象的开销远比直接改变真实DOM要小得多。组件化的开发思想。第二点来说就是它们都提倡这种组件化的开发思想,也就是建议将应用分拆成一个个功能明确的模块,再将这些模块整合在一起以满足我们的业务需求。Props。Vue和React中都有props的概念,允许父组件向子组件传递数据。构建工具、Chrome插件、配套框架。还有就是它们的构建工具以及Chrome插件、配套框架都很完善。比如构建工具,React中可以使用CRA,Vue中可以使用对应的脚手架vue-cli。对于配套框架Vue中有vuex、vue-router,React中有react-router、redux。不同点
模版的编写。最大的不同就是模版的编写,Vue鼓励你去写近似常规HTML的模板,React推荐你使用JSX去书写。状态管理与对象属性。在React中,应用的状态是比较关键的概念,也就是state对象,它允许你使用setState去更新状态。但是在Vue中,state对象并不是必须的,数据是由data属性在Vue对象中进行管理。虚拟DOM的处理方式不同。Vue中的虚拟DOM控制了颗粒度,组件层面走watcher通知,而组件内部走vdom做diff,这样,既不会有太多watcher,也不会让vdom的规模过大。而React走了类似于CPU调度的逻辑,把vdom这棵树,微观上变成了链表,然后利用浏览器的空闲时间来做diffVue项目中你是如何解决跨域的呢一、跨域是什么跨域本质是浏览器基于同源策略的一种安全手段
同源策略(Sameoriginpolicy),是一种约定,它是浏览器最核心也最基本的安全功能
所谓同源(即指在同一个域)具有以下三个相同点
协议相同(protocol)主机相同(host)端口相同(port)反之非同源请求,也就是协议、端口、主机其中一项不相同的时候,这时候就会产生跨域
一定要注意跨域是浏览器的限制,你用抓包工具抓取接口数据,是可以看到接口已经把数据返回回来了,只是浏览器的限制,你获取不到数据。用postman请求接口能够请求到数据。这些再次印证了跨域是浏览器的限制。
Class 与 Style 如何动态绑定Class 可以通过对象语法和数组语法进行动态绑定
对象语法:
<div v-bind:class="{ active: isActive, 'text-danger': hasError }"></div>data: { isActive: true, hasError: false}数组语法:
<div v-bind:class="[isActive ? activeClass : '', errorClass]"></div>data: { activeClass: 'active', errorClass: 'text-danger'}Style 也可以通过对象语法和数组语法进行动态绑定
对象语法:
<div v-bind:style="{ color: activeColor, fontSize: fontSize + 'px' }"></div>data: { activeColor: 'red', fontSize: 30}数组语法:
<div v-bind:style="[styleColor, styleSize]"></div>data: { styleColor: { color: 'red' }, styleSize:{ fontSize:'23px' }}了解history有哪些方法吗?说下它们的区别history 这个对象在html5的时候新加入两个api history.pushState() 和 history.repalceState() 这两个API可以在不进行刷新的情况下,操作浏览器的历史纪录。唯一不同的是,前者是新增一个历史记录,后者是直接替换当前的历史记录。
从参数上来说:
window.history.pushState(state,title,url)//state:需要保存的数据,这个数据在触发popstate事件时,可以在event.state里获取//title:标题,基本没用,一般传null//url:设定新的历史纪录的url。新的url与当前url的origin必须是一样的,否则会抛出错误。url可以时绝对路径,也可以是相对路径。//如 当前url是 https://www.baidu.com/a/,执行history.pushState(null, null, './qq/'),则变成 https://www.baidu.com/a/qq/,//执行history.pushState(null, null, '/qq/'),则变成 https://www.baidu.com/qq/window.history.replaceState(state,title,url)//与pushState 基本相同,但她是修改当前历史纪录,而 pushState 是创建新的历史纪录另外还有:
window.history.back() 后退window.history.forward()前进window.history.go(1) 前进或者后退几步从触发事件的监听上来说:
pushState()和replaceState()不能被popstate事件所监听而后面三者可以,且用户点击浏览器前进后退键时也可以在Vue中使用插件的步骤采用ES6的import ... from ...语法或CommonJS的require()方法引入插件使用全局方法Vue.use( plugin )使用插件,可以传入一个选项对象Vue.use(MyPlugin, { someOption: true })$route和$router的区别$route是“路由信息对象”,包括path,params,hash,query,fullPath,matched,name等路由信息参数。而$router是“路由实例”对象包括了路由的跳转方法,钩子函数等为什么要使用异步组件节省打包出的结果,异步组件分开打包,采用jsonp的方式进行加载,有效解决文件过大的问题。核心就是包组件定义变成一个函数,依赖import() 语法,可以实现文件的分割加载。components:{ AddCustomerSchedule:(resolve)=>import("../components/AddCustomer") // require([]) }原理
export function ( Ctor: Class<Component> | Function | Object | void, data: ?VNodeData, context: Component, children: ?Array<VNode>, tag?: string ): VNode | Array<VNode> | void { // async component let asyncFactory if (isUndef(Ctor.cid)) { asyncFactory = Ctor Ctor = resolveAsyncComponent(asyncFactory, baseCtor) // 默认调用此函数时返回 undefiend // 第二次渲染时Ctor不为undefined if (Ctor === undefined) { return createAsyncPlaceholder( // 渲染占位符 空虚拟节点 asyncFactory, data, context, children, tag ) } } }function resolveAsyncComponent ( factory: Function, baseCtor: Class<Component> ): Class<Component> | void { if (isDef(factory.resolved)) { // 3.在次渲染时可以拿到获取的最新组件 return factory.resolved } const resolve = once((res: Object | Class<Component>) => { factory.resolved = ensureCtor(res, baseCtor) if (!sync) { forceRender(true) //2. 强制更新视图重新渲染 } else { owners.length = 0 } }) const reject = once(reason => { if (isDef(factory.errorComp)) { factory.error = true forceRender(true) } }) const res = factory(resolve, reject)// 1.将resolve方法和reject方法传入,用户调用 resolve方法后 sync = false return factory.resolved }函数式组件优势和原理函数组件的特点
函数式组件需要在声明组件是指定 functional:true不需要实例化,所以没有this,this通过render函数的第二个参数context来代替没有生命周期钩子函数,不能使用计算属性,watch不能通过$emit 对外暴露事件,调用事件只能通过context.listeners.click的方式调用外部传入的事件因为函数式组件是没有实例化的,所以在外部通过ref去引用组件时,实际引用的是HTMLElement函数式组件的props可以不用显示声明,所以没有在props里面声明的属性都会被自动隐式解析为prop,而普通组件所有未声明的属性都解析到$attrs里面,并自动挂载到组件根元素上面(可以通过inheritAttrs属性禁止)优点
由于函数式组件不需要实例化,无状态,没有生命周期,所以渲染性能要好于普通组件函数式组件结构比较简单,代码结构更清晰使用场景:
一个简单的展示组件,作为容器组件使用 比如 router-view 就是一个函数式组件“高阶组件”——用于接收一个组件作为参数,返回一个被包装过的组件例子
Vue.component('functional',{ // 构造函数产生虚拟节点的 functional:true, // 函数式组件 // data={attrs:{}} render(h){ return h('div','test') }})const vm = new Vue({ el: '#app'})源码相关
// functional componentif (isTrue(Ctor.options.functional)) { // 带有functional的属性的就是函数式组件 return createFunctionalComponent(Ctor, propsData, data, context, children)}// extract listeners, since these needs to be treated as// child component listeners instead of DOM listenersconst listeners = data.on // 处理事件// replace with listeners with .native modifier// so it gets processed during parent component patch.data.on = data.nativeOn // 处理原生事件// install component management hooks onto the placeholder nodeinstallComponentHooks(data) // 安装组件相关钩子 (函数式组件没有调用此方法,从而性能高于普通组件)Vue.set的实现原理给对应和数组本身都增加了dep属性当给对象新增不存在的属性则触发对象依赖的watcher去更新当修改数组索引时,我们调用数组本身的splice去更新数组(数组的响应式原理就是重新了splice等方法,调用splice就会触发视图更新)基本使用
以下方法调用会改变原始数组:push(), pop(), shift(), unshift(), splice(), sort(), reverse(),Vue.set( target, key, value )
调用方法:Vue.set(target, key, value ) target:要更改的数据源(可以是对象或者数组) key:要更改的具体数据 value :重新赋的值<div id="app">{{user.name}} {{user.age}}</div><div id="app"></div><script> // 1. 依赖收集的特点:给每个属性都增加一个dep属性,dep属性会进行收集,收集的是watcher // 2. vue会给每个对象也增加一个dep属性 const vm = new Vue({ el: '#app', data: { // vm._data user: {name:'poetry'} } }); // 对象的话:调用defineReactive在user对象上定义一个age属性,增加到响应式数据中,触发对象本身的watcher,ob.dep.notify()更新 // 如果是数组 通过调用 splice方法,触发视图更新 vm.$set(vm.user, 'age', 20); // 不能给根属性添加,因为给根添加属性 性能消耗太大,需要做很多处理 // 修改肯定是同步的 -> 更新都是一步的 queuewatcher</script>相关源码
// src/core/observer/index.js 44export Observer { // new Observer(value) value: any; dep: Dep; vmCount: number; // number of vms that have this object as root $data constructor (value: any) { this.value = value this.dep = new Dep() // 给所有对象类型增加dep属性 }}// src/core/observer/index.js 201export function set (target: Array<any> | Object, key: any, val: any): any { // 1.是开发环境 target 没定义或者是基础类型则报错 if (process.env.NODE_ENV !== 'production' && (isUndef(target) || isPrimitive(target)) ) { warn(`Cannot set reactive property on undefined, null, or primitive value: ${(target: any)}`) } // 2.如果是数组 Vue.set(array,1,100); 调用我们重写的splice方法 (这样可以更新视图) if (Array.isArray(target) && isValidArrayIndex(key)) { target.length = Math.max(target.length, key) // 利用数组的splice变异方法触发响应式 target.splice(key, 1, val) return val } // 3.如果是对象本身的属性,则直接添加即可 if (key in target && !(key in Object.prototype)) { target[key] = val // 直接修改属性值 return val } // 4.如果是Vue实例 或 根数据data时 报错,(更新_data 无意义) const ob = (target: any).__ob__ if (target._isVue || (ob && ob.vmCount)) { process.env.NODE_ENV !== 'production' && warn( 'Avoid adding reactive properties to a Vue instance or its root $data ' + 'at runtime - declare it upfront in the data option.' ) return val } // 5.如果不是响应式的也不需要将其定义成响应式属性 if (!ob) { target[key] = val return val } // 6.将属性定义成响应式的 defineReactive(ob.value, key, val) // 通知视图更新 ob.dep.notify() return val}我们阅读以上源码可知,vm.$set 的实现原理是:
如果目标是数组 ,直接使用数组的 splice 方法触发相应式;如果目标是对象 ,会先判读属性是否存在、对象是否是响应式,最终如果要对属性进行响应式处理,则是通过调用 defineReactive 方法进行响应式处理( defineReactive 方法就是 Vue 在初始化对象时,给对象属性采用 Object.defineProperty 动态添加 getter 和 setter 的功能所调用的方法)Vue为什么没有类似于React中shouldComponentUpdate的生命周期考点: Vue的变化侦测原理前置知识: 依赖收集、虚拟DOM、响应式系统根本原因是Vue与React的变化侦测方式有所不同
当React知道发生变化后,会使用Virtual Dom Diff进行差异检测,但是很多组件实际上是肯定不会发生变化的,这个时候需要 shouldComponentUpdate 进行手动操作来减少diff,从而提高程序整体的性能Vue在一开始就知道那个组件发生了变化,不需要手动控制diff,而组件内部采用的diff方式实际上是可以引入类似于shouldComponentUpdate相关生命周期的,但是通常合理大小的组件不会有过量的diff,手动优化的价值有限,因此目前Vue并没有考虑引入shouldComponentUpdate这种手动优化的生命周期vue-router中如何保护路由分析
路由保护在应用开发过程中非常重要,几乎每个应用都要做各种路由权限管理,因此相当考察使用者基本功。
体验
全局守卫:
const router = createRouter({ ... })router.beforeEach((to, from) => { // ... // 返回 false 以取消导航 return false})路由独享守卫:
const routes = [ { path: '/users/:id', component: UserDetails, beforeEnter: (to, from) => { // reject the navigation return false }, },]组件内的守卫:
javascriptconst UserDetails = { template: `...`, beforeRouteEnter(to, from) { // 在渲染该组件的对应路由被验证前调用 }, beforeRouteUpdate(to, from) { // 在当前路由改变,但是该组件被复用时调用 }, beforeRouteLeave(to, from) { // 在导航离开渲染该组件的对应路由时调用 },}回答
vue-router中保护路由的方法叫做路由守卫,主要用来通过跳转或取消的方式守卫导航。路由守卫有三个级别:全局、路由独享、组件级。影响范围由大到小,例如全局的router.beforeEach(),可以注册一个全局前置守卫,每次路由导航都会经过这个守卫,因此在其内部可以加入控制逻辑决定用户是否可以导航到目标路由;在路由注册的时候可以加入单路由独享的守卫,例如beforeEnter,守卫只在进入路由时触发,因此只会影响这个路由,控制更精确;我们还可以为路由组件添加守卫配置,例如beforeRouteEnter,会在渲染该组件的对应路由被验证前调用,控制的范围更精确了。用户的任何导航行为都会走navigate方法,内部有个guards队列按顺序执行用户注册的守卫钩子函数,如果没有通过验证逻辑则会取消原有的导航。原理
runGuardQueue(guards)链式的执行用户在各级别注册的守卫钩子函数,通过则继续下一个级别的守卫,不通过进入catch流程取消原本导航
// 源码runGuardQueue(guards) .then(() => { // check global guards beforeEach guards = [] for (const guard of beforeGuards.list()) { guards.push(guardToPromiseFn(guard, to, from)) } guards.push(canceledNavigationCheck) return runGuardQueue(guards) }) .then(() => { // check in components beforeRouteUpdate guards = extractComponentsGuards( updatingRecords, 'beforeRouteUpdate', to, from ) for (const record of updatingRecords) { record.updateGuards.forEach(guard => { guards.push(guardToPromiseFn(guard, to, from)) }) } guards.push(canceledNavigationCheck) // run the queue of per route beforeEnter guards return runGuardQueue(guards) }) .then(() => { // check the route beforeEnter guards = [] for (const record of to.matched) { // do not trigger beforeEnter on reused views if (record.beforeEnter && !from.matched.includes(record)) { if (isArray(record.beforeEnter)) { for (const beforeEnter of record.beforeEnter) guards.push(guardToPromiseFn(beforeEnter, to, from)) } else { guards.push(guardToPromiseFn(record.beforeEnter, to, from)) } } } guards.push(canceledNavigationCheck) // run the queue of per route beforeEnter guards return runGuardQueue(guards) }) .then(() => { // NOTE: at this point to.matched is normalized and does not contain any () => Promise<Component> // clear existing enterCallbacks, these are added by extractComponentsGuards to.matched.forEach(record => (record.enterCallbacks = {})) // check in-component beforeRouteEnter guards = extractComponentsGuards( enteringRecords, 'beforeRouteEnter', to, from ) guards.push(canceledNavigationCheck) // run the queue of per route beforeEnter guards return runGuardQueue(guards) }) .then(() => { // check global guards beforeResolve guards = [] for (const guard of beforeResolveGuards.list()) { guards.push(guardToPromiseFn(guard, to, from)) } guards.push(canceledNavigationCheck) return runGuardQueue(guards) }) // catch any navigation canceled .catch(err => isNavigationFailure(err, ErrorTypes.NAVIGATION_CANCELLED) ? err : Promise.reject(err) )源码位置(opens new window)
Vue-router 路由钩子在生命周期的体现一、Vue-Router导航守卫
有的时候,需要通过路由来进行一些操作,比如最常见的登录权限验证,当用户满足条件时,才让其进入导航,否则就取消跳转,并跳到登录页面让其登录。 为此有很多种方法可以植入路由的导航过程:全局的,单个路由独享的,或者组件级的
全局路由钩子vue-router全局有三个路由钩子;
router.beforeEach 全局前置守卫 进入路由之前router.beforeResolve 全局解析守卫(2.5.0+)在 beforeRouteEnter 调用之后调用router.afterEach 全局后置钩子 进入路由之后具体使用∶
beforeEach(判断是否登录了,没登录就跳转到登录页)router.beforeEach((to, from, next) => { let ifInfo = Vue.prototype.$common.getSession('userData'); // 判断是否登录的存储信息 if (!ifInfo) { // sessionStorage里没有储存user信息 if (to.path == '/') { //如果是登录页面路径,就直接next() next(); } else { //不然就跳转到登录 Message.warning("请重新登录!"); window.location.href = Vue.prototype.$loginUrl; } } else { return next(); }})afterEach (跳转之后滚动条回到顶部)router.afterEach((to, from) => { // 跳转之后滚动条回到顶部 window.scrollTo(0,0);});单个路由独享钩子beforeEnter 如果不想全局配置守卫的话,可以为某些路由单独配置守卫,有三个参数∶ to、from、next
export default [ { path: '/', name: 'login', component: login, beforeEnter: (to, from, next) => { console.log('即将进入登录页面') next() } }]组件内钩子beforeRouteUpdate、beforeRouteEnter、beforeRouteLeave
这三个钩子都有三个参数∶to、from、next
beforeRouteEnter∶ 进入组件前触发beforeRouteUpdate∶ 当前地址改变并且改组件被复用时触发,举例来说,带有动态参数的路径foo/∶id,在 /foo/1 和 /foo/2 之间跳转的时候,由于会渲染同样的foa组件,这个钩子在这种情况下就会被调用beforeRouteLeave∶ 离开组件被调用注意点,beforeRouteEnter组件内还访问不到this,因为该守卫执行前组件实例还没有被创建,需要传一个回调给 next来访问,例如:
beforeRouteEnter(to, from, next) { next(target => { if (from.path == '/classProcess') { target.isFromProcess = true } }) }二、Vue路由钩子在生命周期函数的体现
完整的路由导航解析流程(不包括其他生命周期)触发进入其他路由。调用要离开路由的组件守卫beforeRouteLeave调用局前置守卫∶ beforeEach在重用的组件里调用 beforeRouteUpdate调用路由独享守卫 beforeEnter。解析异步路由组件。在将要进入的路由组件中调用 beforeRouteEnter调用全局解析守卫 beforeResolve导航被确认。调用全局后置钩子的 afterEach 钩子。触发DOM更新(mounted)。执行beforeRouteEnter 守卫中传给 next 的回调函数触发钩子的完整顺序路由导航、keep-alive、和组件生命周期钩子结合起来的,触发顺序,假设是从a组件离开,第一次进入b组件∶
beforeRouteLeave:路由组件的组件离开路由前钩子,可取消路由离开。beforeEach:路由全局前置守卫,可用于登录验证、全局路由loading等。beforeEnter:路由独享守卫beforeRouteEnter:路由组件的组件进入路由前钩子。beforeResolve:路由全局解析守卫afterEach:路由全局后置钩子beforeCreate:组件生命周期,不能访问tAis。created;组件生命周期,可以访问tAis,不能访问dom。beforeMount:组件生命周期deactivated:离开缓存组件a,或者触发a的beforeDestroy和destroyed组件销毁钩子。mounted:访问/操作dom。activated:进入缓存组件,进入a的嵌套子组件(如果有的话)。执行beforeRouteEnter回调函数next。导航行为被触发到导航完成的整个过程导航行为被触发,此时导航未被确认。在失活的组件里调用离开守卫 beforeRouteLeave。调用全局的 beforeEach守卫。在重用的组件里调用 beforeRouteUpdate 守卫(2.2+)。在路由配置里调用 beforeEnteY。解析异步路由组件(如果有)。在被激活的组件里调用 beforeRouteEnter。调用全局的 beforeResolve 守卫(2.5+),标示解析阶段完成。导航被确认。调用全局的 afterEach 钩子。非重用组件,开始组件实例的生命周期:beforeCreate&created、beforeMount&mounted触发 DOM 更新。用创建好的实例调用 beforeRouteEnter守卫中传给 next 的回调函数。导航完成Vue-router 导航守卫有哪些全局前置/钩子:beforeEach、beforeResolve、afterEach路由独享的守卫:beforeEnter组件内的守卫:beforeRouteEnter、beforeRouteUpdate、beforeRouteLeaveVue的diff算法详细分析1. 是什么
diff 算法是一种通过同层的树节点进行比较的高效算法
其有两个特点:
比较只会在同层级进行, 不会跨层级比较在diff比较的过程中,循环从两边向中间比较diff 算法在很多场景下都有应用,在 vue 中,作用于虚拟 dom 渲染成真实 dom 的新旧 VNode 节点比较
2. 比较方式
diff整体策略为:深度优先,同层比较
比较只会在同层级进行, 不会跨层级比较 比较的过程中,循环从两边向中间收拢
下面举个vue通过diff算法更新的例子:
新旧VNode节点如下图所示:
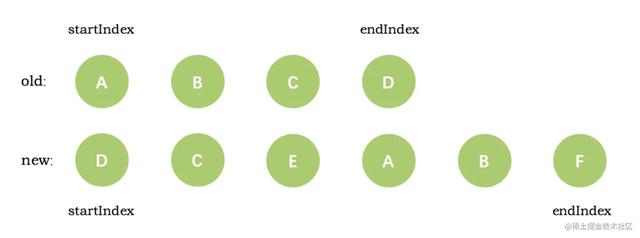
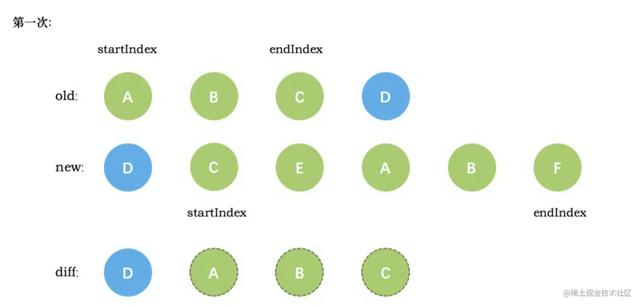
第一次循环后,发现旧节点D与新节点D相同,直接复用旧节点D作为diff后的第一个真实节点,同时旧节点endIndex移动到C,新节点的 startIndex 移动到了 C
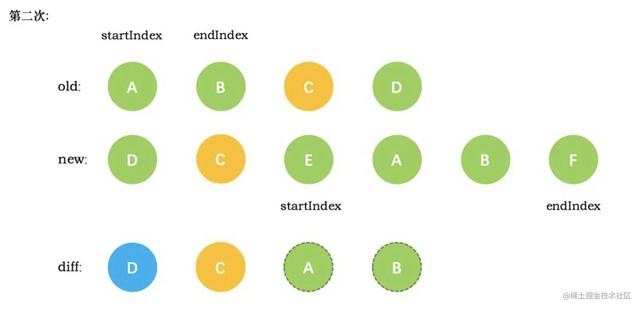
第二次循环后,同样是旧节点的末尾和新节点的开头(都是 C)相同,同理,diff 后创建了 C 的真实节点插入到第一次创建的 D 节点后面。同时旧节点的 endIndex 移动到了 B,新节点的 startIndex 移动到了 E
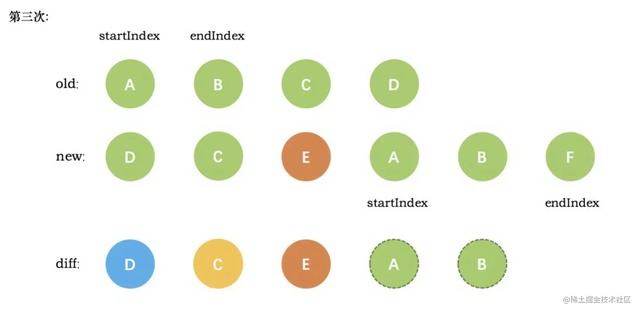
第三次循环中,发现E没有找到,这时候只能直接创建新的真实节点 E,插入到第二次创建的 C 节点之后。同时新节点的 startIndex 移动到了 A。旧节点的 startIndex 和 endIndex 都保持不动
第四次循环中,发现了新旧节点的开头(都是 A)相同,于是 diff 后创建了 A 的真实节点,插入到前一次创建的 E 节点后面。同时旧节点的 startIndex 移动到了 B,新节点的startIndex 移动到了 B

第五次循环中,情形同第四次循环一样,因此 diff 后创建了 B 真实节点 插入到前一次创建的 A 节点后面。同时旧节点的 startIndex移动到了 C,新节点的 startIndex 移动到了 F
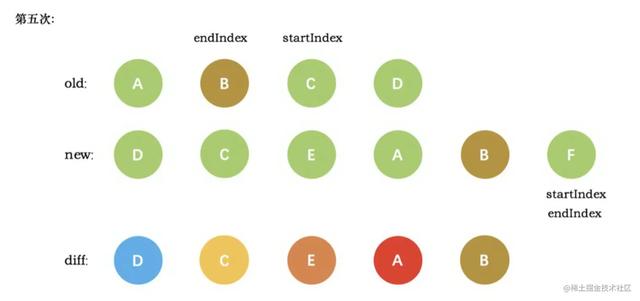
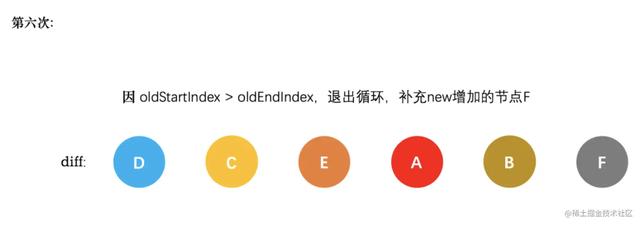
新节点的 startIndex 已经大于 endIndex 了,需要创建 newStartIdx 和 newEndIdx 之间的所有节点,也就是节点F,直接创建 F 节点对应的真实节点放到 B 节点后面
3. 原理分析
当数据发生改变时,set方法会调用Dep.notify通知所有订阅者Watcher,订阅者就会调用patch给真实的DOM打补丁,更新相应的视图
源码位置:src/core/vdom/patch.js
function patch(oldVnode, vnode, hydrating, removeOnly) { if (isUndef(vnode)) { // 没有新节点,直接执行destory钩子函数 if (isDef(oldVnode)) invokeDestroyHook(oldVnode) return } let isInitialPatch = false const insertedVnodeQueue = [] if (isUndef(oldVnode)) { isInitialPatch = true createElm(vnode, insertedVnodeQueue) // 没有旧节点,直接用新节点生成dom元素 } else { const isRealElement = isDef(oldVnode.nodeType) if (!isRealElement && sameVnode(oldVnode, vnode)) { // 判断旧节点和新节点自身一样,一致执行patchVnode patchVnode(oldVnode, vnode, insertedVnodeQueue, null, null, removeOnly) } else { // 否则直接销毁及旧节点,根据新节点生成dom元素 if (isRealElement) { if (oldVnode.nodeType === 1 && oldVnode.hasAttribute(SSR_ATTR)) { oldVnode.removeAttribute(SSR_ATTR) hydrating = true } if (isTrue(hydrating)) { if (hydrate(oldVnode, vnode, insertedVnodeQueue)) { invokeInsertHook(vnode, insertedVnodeQueue, true) return oldVnode } } oldVnode = emptyNodeAt(oldVnode) } return vnode.elm } }}patch函数前两个参数位为oldVnode 和 Vnode ,分别代表新的节点和之前的旧节点,主要做了四个判断:
没有新节点,直接触发旧节点的destory钩子没有旧节点,说明是页面刚开始初始化的时候,此时,根本不需要比较了,直接全是新建,所以只调用 createElm旧节点和新节点自身一样,通过 sameVnode 判断节点是否一样,一样时,直接调用 patchVnode去处理这两个节点旧节点和新节点自身不一样,当两个节点不一样的时候,直接创建新节点,删除旧节点下面主要讲的是patchVnode部分
function patchVnode (oldVnode, vnode, insertedVnodeQueue, removeOnly) { // 如果新旧节点一致,什么都不做 if (oldVnode === vnode) { return } // 让vnode.el引用到现在的真实dom,当el修改时,vnode.el会同步变化 const elm = vnode.elm = oldVnode.elm // 异步占位符 if (isTrue(oldVnode.isAsyncPlaceholder)) { if (isDef(vnode.asyncFactory.resolved)) { hydrate(oldVnode.elm, vnode, insertedVnodeQueue) } else { vnode.isAsyncPlaceholder = true } return } // 如果新旧都是静态节点,并且具有相同的key // 当vnode是克隆节点或是v-once指令控制的节点时,只需要把oldVnode.elm和oldVnode.child都复制到vnode上 // 也不用再有其他操作 if (isTrue(vnode.isStatic) && isTrue(oldVnode.isStatic) && vnode.key === oldVnode.key && (isTrue(vnode.isCloned) || isTrue(vnode.isOnce)) ) { vnode.componentInstance = oldVnode.componentInstance return } let i const data = vnode.data if (isDef(data) && isDef(i = data.hook) && isDef(i = i.prepatch)) { i(oldVnode, vnode) } const oldCh = oldVnode.children const ch = vnode.children if (isDef(data) && isPatchable(vnode)) { for (i = 0; i < cbs.update.length; ++i) cbs.update[i](oldVnode, vnode) if (isDef(i = data.hook) && isDef(i = i.update)) i(oldVnode, vnode) } // 如果vnode不是文本节点或者注释节点 if (isUndef(vnode.text)) { // 并且都有子节点 if (isDef(oldCh) && isDef(ch)) { // 并且子节点不完全一致,则调用updateChildren if (oldCh !== ch) updateChildren(elm, oldCh, ch, insertedVnodeQueue, removeOnly) // 如果只有新的vnode有子节点 } else if (isDef(ch)) { if (isDef(oldVnode.text)) nodeOps.setTextContent(elm, '') // elm已经引用了老的dom节点,在老的dom节点上添加子节点 addVnodes(elm, null, ch, 0, ch.length - 1, insertedVnodeQueue) // 如果新vnode没有子节点,而vnode有子节点,直接删除老的oldCh } else if (isDef(oldCh)) { removeVnodes(elm, oldCh, 0, oldCh.length - 1) // 如果老节点是文本节点 } else if (isDef(oldVnode.text)) { nodeOps.setTextContent(elm, '') } // 如果新vnode和老vnode是文本节点或注释节点 // 但是vnode.text != oldVnode.text时,只需要更新vnode.elm的文本内容就可以 } else if (oldVnode.text !== vnode.text) { nodeOps.setTextContent(elm, vnode.text) } if (isDef(data)) { if (isDef(i = data.hook) && isDef(i = i.postpatch)) i(oldVnode, vnode) } }patchVnode主要做了几个判断:
新节点是否是文本节点,如果是,则直接更新dom的文本内容为新节点的文本内容新节点和旧节点如果都有子节点,则处理比较更新子节点只有新节点有子节点,旧节点没有,那么不用比较了,所有节点都是全新的,所以直接全部新建就好了,新建是指创建出所有新DOM,并且添加进父节点只有旧节点有子节点而新节点没有,说明更新后的页面,旧节点全部都不见了,那么要做的,就是把所有的旧节点删除,也就是直接把DOM 删除子节点不完全一致,则调用updateChildren
function updateChildren (parentElm, oldCh, newCh, insertedVnodeQueue, removeOnly) { let oldStartIdx = 0 // 旧头索引 let newStartIdx = 0 // 新头索引 let oldEndIdx = oldCh.length - 1 // 旧尾索引 let newEndIdx = newCh.length - 1 // 新尾索引 let oldStartVnode = oldCh[0] // oldVnode的第一个child let oldEndVnode = oldCh[oldEndIdx] // oldVnode的最后一个child let newStartVnode = newCh[0] // newVnode的第一个child let newEndVnode = newCh[newEndIdx] // newVnode的最后一个child let oldKeyToIdx, idxInOld, vnodeToMove, refElm // removeOnly is a special flag used only by <transition-group> // to ensure removed elements stay in correct relative positions // during leaving transitions const canMove = !removeOnly // 如果oldStartVnode和oldEndVnode重合,并且新的也都重合了,证明diff完了,循环结束 while (oldStartIdx <= oldEndIdx && newStartIdx <= newEndIdx) { // 如果oldVnode的第一个child不存在 if (isUndef(oldStartVnode)) { // oldStart索引右移 oldStartVnode = oldCh[++oldStartIdx] // Vnode has been moved left // 如果oldVnode的最后一个child不存在 } else if (isUndef(oldEndVnode)) { // oldEnd索引左移 oldEndVnode = oldCh[--oldEndIdx] // oldStartVnode和newStartVnode是同一个节点 } else if (sameVnode(oldStartVnode, newStartVnode)) { // patch oldStartVnode和newStartVnode, 索引左移,继续循环 patchVnode(oldStartVnode, newStartVnode, insertedVnodeQueue) oldStartVnode = oldCh[++oldStartIdx] newStartVnode = newCh[++newStartIdx] // oldEndVnode和newEndVnode是同一个节点 } else if (sameVnode(oldEndVnode, newEndVnode)) { // patch oldEndVnode和newEndVnode,索引右移,继续循环 patchVnode(oldEndVnode, newEndVnode, insertedVnodeQueue) oldEndVnode = oldCh[--oldEndIdx] newEndVnode = newCh[--newEndIdx] // oldStartVnode和newEndVnode是同一个节点 } else if (sameVnode(oldStartVnode, newEndVnode)) { // Vnode moved right // patch oldStartVnode和newEndVnode patchVnode(oldStartVnode, newEndVnode, insertedVnodeQueue) // 如果removeOnly是false,则将oldStartVnode.eml移动到oldEndVnode.elm之后 canMove && nodeOps.insertBefore(parentElm, oldStartVnode.elm, nodeOps.nextSibling(oldEndVnode.elm)) // oldStart索引右移,newEnd索引左移 oldStartVnode = oldCh[++oldStartIdx] newEndVnode = newCh[--newEndIdx] // 如果oldEndVnode和newStartVnode是同一个节点 } else if (sameVnode(oldEndVnode, newStartVnode)) { // Vnode moved left // patch oldEndVnode和newStartVnode patchVnode(oldEndVnode, newStartVnode, insertedVnodeQueue) // 如果removeOnly是false,则将oldEndVnode.elm移动到oldStartVnode.elm之前 canMove && nodeOps.insertBefore(parentElm, oldEndVnode.elm, oldStartVnode.elm) // oldEnd索引左移,newStart索引右移 oldEndVnode = oldCh[--oldEndIdx] newStartVnode = newCh[++newStartIdx] // 如果都不匹配 } else { if (isUndef(oldKeyToIdx)) oldKeyToIdx = createKeyToOldIdx(oldCh, oldStartIdx, oldEndIdx) // 尝试在oldChildren中寻找和newStartVnode的具有相同的key的Vnode idxInOld = isDef(newStartVnode.key) ? oldKeyToIdx[newStartVnode.key] : findIdxInOld(newStartVnode, oldCh, oldStartIdx, oldEndIdx) // 如果未找到,说明newStartVnode是一个新的节点 if (isUndef(idxInOld)) { // New element // 创建一个新Vnode createElm(newStartVnode, insertedVnodeQueue, parentElm, oldStartVnode.elm) // 如果找到了和newStartVnodej具有相同的key的Vnode,叫vnodeToMove } else { vnodeToMove = oldCh[idxInOld] /* istanbul ignore if */ if (process.env.NODE_ENV !== 'production' && !vnodeToMove) { warn( 'It seems there are duplicate keys that is causing an update error. ' + 'Make sure each v-for item has a unique key.' ) } // 比较两个具有相同的key的新节点是否是同一个节点 //不设key,newCh和oldCh只会进行头尾两端的相互比较,设key后,除了头尾两端的比较外,还会从用key生成的对象oldKeyToIdx中查找匹配的节点,所以为节点设置key可以更高效的利用dom。 if (sameVnode(vnodeToMove, newStartVnode)) { // patch vnodeToMove和newStartVnode patchVnode(vnodeToMove, newStartVnode, insertedVnodeQueue) // 清除 oldCh[idxInOld] = undefined // 如果removeOnly是false,则将找到的和newStartVnodej具有相同的key的Vnode,叫vnodeToMove.elm // 移动到oldStartVnode.elm之前 canMove && nodeOps.insertBefore(parentElm, vnodeToMove.elm, oldStartVnode.elm) // 如果key相同,但是节点不相同,则创建一个新的节点 } else { // same key but different element. treat as new element createElm(newStartVnode, insertedVnodeQueue, parentElm, oldStartVnode.elm) } } // 右移 newStartVnode = newCh[++newStartIdx] } }while循环主要处理了以下五种情景:
当新老 VNode 节点的 start 相同时,直接 patchVnode ,同时新老 VNode 节点的开始索引都加 1当新老 VNode 节点的 end相同时,同样直接 patchVnode ,同时新老 VNode 节点的结束索引都减 1当老 VNode 节点的 start 和新 VNode 节点的 end 相同时,这时候在 patchVnode 后,还需要将当前真实 dom 节点移动到 oldEndVnode 的后面,同时老 VNode 节点开始索引加 1,新 VNode 节点的结束索引减 1当老 VNode 节点的 end 和新 VNode 节点的 start 相同时,这时候在 patchVnode 后,还需要将当前真实 dom 节点移动到 oldStartVnode 的前面,同时老 VNode 节点结束索引减 1,新 VNode 节点的开始索引加 1如果都不满足以上四种情形,那说明没有相同的节点可以复用,则会分为以下两种情况: 从旧的 VNode 为 key 值,对应 index 序列为 value 值的哈希表中找到与 newStartVnode 一致 key 的旧的 VNode 节点,再进行patchVnode,同时将这个真实 dom移动到 oldStartVnode 对应的真实 dom 的前面 调用 createElm 创建一个新的 dom 节点放到当前 newStartIdx 的位置小结
当数据发生改变时,订阅者watcher就会调用patch给真实的DOM打补丁通过isSameVnode进行判断,相同则调用patchVnode方法patchVnode做了以下操作: 找到对应的真实dom,称为el 如果都有都有文本节点且不相等,将el文本节点设置为Vnode的文本节点 如果oldVnode有子节点而VNode没有,则删除el子节点 如果oldVnode没有子节点而VNode有,则将VNode的子节点真实化后添加到el 如果两者都有子节点,则执行updateChildren函数比较子节点updateChildren主要做了以下操作: 设置新旧VNode的头尾指针 新旧头尾指针进行比较,循环向中间靠拢,根据情况调用patchVnode进行patch重复流程、调用createElem创建一个新节点,从哈希表寻找 key一致的VNode 节点再分情况操作作者:bb_xiaxia1998链接:https://juejin.cn/post/7204844328111374391