作者:京东云 张士杰
#从第⼀步骤到第四步骤是完成DeepSeek本地部署和使⽤,可以满⾜中⼩企业环境的稳定 使⽤,第五步骤为基于AnythingLLM和本地数据进⾏训练(基于本地数据搭建本地知识 库): ⼀:京东云GPU云主机环境准备 ⼆:部署Ollama 三:运⾏DeepSeek模型 四:图形客户端使⽤ #第五步骤可以不执⾏ 五:本地数据投喂
⼀:京东云GPU云主机环境准备:DeepSeek的不同版本模型对主机硬件(主要是CPU、内存和GPU)的要求不⼀样,推荐使⽤拥有单独GPU的主机进⾏部署以获得更好的使⽤体验,显卡推荐使⽤如NVIDIA RTX 3090或同等以上规格的显卡,CPU需要⽀持AVX2、AVX-512等指令集可以进⼀步提⾼响应性能, 如已有符合业务需求的主机环境可以跳过当前的主机环境准备步骤。

1.1: 京东云创建GPU云主机:基于实际业务需求选择云主机计费模式、地域、可⽤区、CPU架构、系统镜像及系统版本, 企业环境对于稳定性要求⽐较⾼通常使⽤Linux系统运⾏业务系统, 本步骤以Ubuntu 22.04 LTS系统版本为例(Rocky Linux及RHEL的操作步骤⼀致)、GPU为vidia Tesla P40, 演示基于Ollama部署DeepSeek-R1 :

选择GPU实例规格类型,可选自动安装GPU驱动、或云主机运行成功后单独安装GPU驱动(本文档为单独安装GPU驱动)

自定义云盘类型及大小、然后下一步

自定义云主机网络、安全组、弹性公网IP, 安全组需要允许客户端访问11434端口, 然后下一步

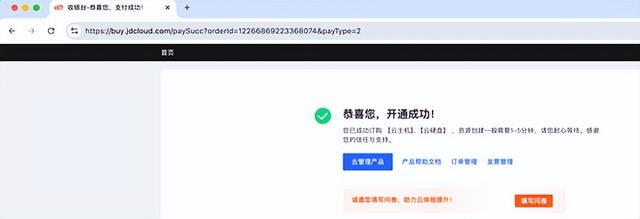
自定义主机密码、主机名称等信息, 然后点击立即购买

勾选已阅读并同意并确认开通

创建完成:
然后在云主机控制台验证主机运行成功

1.2:安装GPU显卡驱动:使⽤SSH⼯具远程连接到实例, 安装显卡驱动(以下为在Ubuntu 2204的显卡驱动安装过程)
root@deepseek-vm:~# apt updateroot@deepseek-vm:~# ubuntu-drivers devices== /sys/devices/pci0000:00/0000:00:0a.0 ==modalias : pci:v000010DEd00001B38sv000010DEsd000011D9bc03sc02i00vendor : NVIDIA Corporationmodel : GP102GL [Tesla P40]driver : nvidia-driver-470-server - distro non-freedriver : nvidia-driver-450-server - distro non-freedriver : nvidia-driver-550 - distro non-free recommendeddriver : nvidia-driver-535-server - distro non-freedriver : nvidia-driver-418-server - distro non-freedriver : nvidia-driver-545 - distro non-freedriver : nvidia-driver-470 - distro non-freedriver : nvidia-driver-535 - distro non-freedriver : nvidia-driver-390 - distro non-freedriver : xserver-xorg-video-nouveau - distro free builtinroot@deepseek-vm:~# apt install nvidia-driver-550 -y #通过ubuntu仓库安装推荐的驱动版本或使用其它方式安装显卡驱动root@deepseek-vm:~# reboot #重启服务器以使显卡驱动生效root@deepseek-vm:~# nvidia-smi #重启后验证驱动及显卡状态(当前演示主机为两块NVIDIA Tesla P40显卡)Thu Feb 6 16:45:28 2025 +-----------------------------------------------------------------------------------------+| NVIDIA-SMI 550.120 Driver Version: 550.120 CUDA Version: 12.4 ||-----------------------------------------+------------------------+----------------------+| GPU Name Persistence-M | Bus-Id Disp.A | Volatile Uncorr. ECC || Fan Temp Perf Pwr:Usage/Cap | Memory-Usage | GPU-Util Compute M. || | | MIG M. ||=========================================+========================+======================|| 0 Tesla P40 Off | 00000000:00:09.0 Off | 0 || N/A 24C P8 9W / 250W | 0MiB / 23040MiB | 0% Default || | | N/A |+-----------------------------------------+------------------------+----------------------+| 1 Tesla P40 Off | 00000000:00:0A.0 Off | 0 || N/A 23C P8 9W / 250W | 0MiB / 23040MiB | 0% Default || | | N/A |+-----------------------------------------+------------------------+----------------------+ +-----------------------------------------------------------------------------------------+| Processes: || GPU GI CI PID Type Process name GPU Memory || ID ID Usage ||=========================================================================================|| No running processes found |+-----------------------------------------------------------------------------------------+二:部署Ollama:Ollama是一个开源的 LLM(large language model、大型语言模型)服务工具, 用于简化和降低在本地的部署和使用门槛, 可以快速在本地环境部署和管理LLM运行环境,。
官方地址:Ollama
下载地址:Download Ollama on macOS
ollama官方在linux 系统的安装是基于脚本从github下载安装包进行安装(https://ollama.com/install.sh、受网络环境因素安装过程不稳定),可以使用二进制安装包直接安装跳过在线下载过程。
2.1:下载⼆进制安装包:Ollama可以运⾏在Windows、Linux以及MacOS, 官⽅均提供对应的安装⽂件, ⽣产 环境对稳定性要求⽐较⾼因此会通常使⽤Linux系统, 本⽂的以Ubuntu 2204作为演 示环境:
https://myserver.s3.cn-north-1.jdcloud-oss.com/ollama-linuxamd64. tgz #ollama v0.5.7版本、已经上传到京东云OSS作为临时下载地址 https://github.com/ollama/ollama/releases #github下载地址
编辑
root@deepseek-vm:~# cd /usr/local/src/ root@deepseek-vm:/usr/local/src# wget https://myserver.s3.cnnorth- 1.jdcloud-oss.com/ollama-linux-amd64.tgz
2.2: 部署ollama:ollama/docs/linux.md at main · ollama/ollama · GitHub
root@deepseek-vm:/usr/local/src# tar -C /usr -xzf ollama-linux-amd64.tgz #解压安装文件root@deepseek-vm:/usr/local/src# ollama serve 测试启动 OllamaCouldn't find '/root/.ollama/id_ed25519'. Generating new private key.Your new public key is: ssh-ed25519 AAAA.....2025/02/06 17:08:47 routes.go:1187: INFO server config env="map[CUDA_VISIBLE_DEVICES: GPU_DEVICE_ORDINAL: HIP_VISIBLE_DEVICES: HSA_OVERRIDE_GFX_VERSION: HTTPS_PROXY: HTTP_PROXY: NO_PROXY: OLLAMA_DEBUG:false OLLAMA_FLASH_ATTENTION:false OLLAMA_GPU_OVERHEAD:0 OLLAMA_HOST:http://127.0.0.1:11434 OLLAMA_INTEL_GPU:false OLLAMA_KEEP_ALIVE:5m0s OLLAMA_KV_CACHE_TYPE: OLLAMA_LLM_LIBRARY: OLLAMA_LOAD_TIMEOUT:5m0s OLLAMA_MAX_LOADED_MODELS:0 OLLAMA_MAX_QUEUE:512 OLLAMA_MODELS:/root/.ollama/models OLLAMA_MULTIUSER_CACHE:false OLLAMA_NOHISTORY:false OLLAMA_NOPRUNE:false OLLAMA_NUM_PARALLEL:0 OLLAMA_ORIGINS:[http://localhost https://localhost http://localhost:* https://localhost:* http://127.0.0.1 https://127.0.0.1 http://127.0.0.1:* https://127.0.0.1:* http://0.0.0.0 https://0.0.0.0 http://0.0.0.0:* https://0.0.0.0:* app://* file://* tauri://* vscode-webview://*] OLLAMA_SCHED_SPREAD:false ROCR_VISIBLE_DEVICES: http_proxy: https_proxy: no_proxy:]"time=2025-02-06T17:08:47.465+08:00 level=INFO source=images.go:432 msg="total blobs: 0"time=2025-02-06T17:08:47.465+08:00 level=INFO source=images.go:439 msg="total unused blobs removed: 0"[GIN-debug] [WARNING] Creating an Engine instance with the Logger and Recovery middleware already attached.[GIN-debug] [WARNING] Running in "debug" mode. Switch to "release" mode in production. - using env: export GIN_MODE=release - using code: gin.SetMode(gin.ReleaseMode)[GIN-debug] POST /api/pull --> github.com/ollama/ollama/server.(*Server).PullHandler-fm (5 handlers)[GIN-debug] POST /api/generate --> github.com/ollama/ollama/server.(*Server).GenerateHandler-fm (5 handlers)[GIN-debug] POST /api/chat --> github.com/ollama/ollama/server.(*Server).ChatHandler-fm (5 handlers)[GIN-debug] POST /api/embed --> github.com/ollama/ollama/server.(*Server).EmbedHandler-fm (5 handlers)[GIN-debug] POST /api/embeddings --> github.com/ollama/ollama/server.(*Server).EmbeddingsHandler-fm (5 handlers)[GIN-debug] POST /api/create --> github.com/ollama/ollama/server.(*Server).CreateHandler-fm (5 handlers)[GIN-debug] POST /api/push --> github.com/ollama/ollama/server.(*Server).PushHandler-fm (5 handlers)[GIN-debug] POST /api/copy --> github.com/ollama/ollama/server.(*Server).CopyHandler-fm (5 handlers)[GIN-debug] DELETE /api/delete --> github.com/ollama/ollama/server.(*Server).DeleteHandler-fm (5 handlers)[GIN-debug] POST /api/show --> github.com/ollama/ollama/server.(*Server).ShowHandler-fm (5 handlers)[GIN-debug] POST /api/blobs/:digest --> github.com/ollama/ollama/server.(*Server).CreateBlobHandler-fm (5 handlers)[GIN-debug] HEAD /api/blobs/:digest --> github.com/ollama/ollama/server.(*Server).HeadBlobHandler-fm (5 handlers)[GIN-debug] GET /api/ps --> github.com/ollama/ollama/server.(*Server).PsHandler-fm (5 handlers)[GIN-debug] POST /v1/chat/completions --> github.com/ollama/ollama/server.(*Server).ChatHandler-fm (6 handlers)[GIN-debug] POST /v1/completions --> github.com/ollama/ollama/server.(*Server).GenerateHandler-fm (6 handlers)[GIN-debug] POST /v1/embeddings --> github.com/ollama/ollama/server.(*Server).EmbedHandler-fm (6 handlers)[GIN-debug] GET /v1/models --> github.com/ollama/ollama/server.(*Server).ListHandler-fm (6 handlers)[GIN-debug] GET /v1/models/:model --> github.com/ollama/ollama/server.(*Server).ShowHandler-fm (6 handlers)[GIN-debug] GET / --> github.com/ollama/ollama/server.(*Server).GenerateRoutes.func1 (5 handlers)[GIN-debug] GET /api/tags --> github.com/ollama/ollama/server.(*Server).ListHandler-fm (5 handlers)[GIN-debug] GET /api/version --> github.com/ollama/ollama/server.(*Server).GenerateRoutes.func2 (5 handlers)[GIN-debug] HEAD / --> github.com/ollama/ollama/server.(*Server).GenerateRoutes.func1 (5 handlers)[GIN-debug] HEAD /api/tags --> github.com/ollama/ollama/server.(*Server).ListHandler-fm (5 handlers)[GIN-debug] HEAD /api/version --> github.com/ollama/ollama/server.(*Server).GenerateRoutes.func2 (5 handlers)time=2025-02-06T17:08:47.466+08:00 level=INFO source=routes.go:1238 msg="Listening on 127.0.0.1:11434 (version 0.5.7)"time=2025-02-06T17:08:47.466+08:00 level=INFO source=routes.go:1267 msg="Dynamic LLM libraries" runners="[cpu cpu_avx cpu_avx2 cuda_v11_avx cuda_v12_avx rocm_avx]"time=2025-02-06T17:08:47.466+08:00 level=INFO source=gpu.go:226 msg="looking for compatible GPUs"time=2025-02-06T17:08:48.193+08:00 level=INFO source=types.go:131 msg="inference compute" id=GPU-a9100a2b-3c31-b1b4-0891-c11584b5a57f library=cuda variant=v12 compute=6.1 driver=12.4 name="Tesla P40" total="22.4 GiB" available="22.2 GiB"time=2025-02-06T17:08:48.193+08:00 level=INFO source=types.go:131 msg="inference compute" id=GPU-d652ebd4-0571-78b9-bf01-9a8d1da592e5 library=cuda variant=v12 compute=6.1 driver=12.4 name="Tesla P40" total="22.4 GiB" available="22.2 GiB"2.3:验证Ollama是否正在运行:新建另外⼀个终端、验证Ollama是否正在运⾏: root@deepseek-vm:~# ollama -v ollama version is 0.5.7
2.4:添加 Ollama 作为启动服务:新建账户和组、名称都叫ollama, 以普通账户的身份运⾏Ollama服务、并指定监听在 0.0.0.0:11434,以⽅便外部客户端访问。
root@deepseek-vm:~# useradd -r -s /bin/false -U -m -d /usr/share/ollama ollamaroot@deepseek-vm:~# usermod -a -G ollama root创建/etc/systemd/system/ollama.service 启动文件:root@deepseek-vm:~# vim /etc/systemd/system/ollama.service[Unit]Description=Ollama ServiceAfter=network-online.target[Service]ExecStart=/usr/bin/ollama serveEnvironment="OLLAMA_HOST=0.0.0.0:11434"User=ollamaGroup=ollamaRestart=alwaysRestartSec=3Environment="PATH=$PATH"[Install]WantedBy=default.target#Ctrl+C退出2.3步骤运行的ollama服务、并通过service文件启动服务:root@deepseek-vm:~# systemctl daemon-reloadroot@deepseek-vm:~# systemctl enable ollamaCreated symlink /etc/systemd/system/default.target.wants/ollama.service → /etc/systemd/system/ollama.service.root@deepseek-vm:~# systemctl start ollama.service #启动ollama服务root@deepseek-vm:~# systemctl status ollama.service #确认ollama服务处于运行状态● ollama.service - Ollama Service Loaded: loaded (/etc/systemd/system/ollama.service; enabled; vendor preset: enabled) Active: active (running) since Thu 2025-02-06 17:13:32 CST; 12min ago Main PID: 6871 (ollama) Tasks: 20 (limit: 132577) Memory: 980.6M CPU: 8.662s CGroup: /system.slice/ollama.service └─6871 /usr/bin/ollama serve Feb 06 17:20:05 deepseek-vm ollama[6871]: time=2025-02-06T17:20:05.644+08:00 level=INFO sou>Feb 06 17:23:01 deepseek-vm ollama[6871]: time=2025-02-06T17:23:01.005+08:00 level=INFO sou>Feb 06 17:24:56 deepseek-vm ollama[6871]: time=2025-02-06T17:24:56.005+08:00 level=INFO sou>Feb 06 17:25:16 deepseek-vm ollama[6871]: time=2025-02-06T17:25:16.005+08:00 level=INFO sou>Feb 06 17:25:24 deepseek-vm ollama[6871]: time=2025-02-06T17:25:24.006+08:00 level=INFO sou查看日志并确认无报错:
root@deepseek-vm:~# journalctl -e -u ollama

验证ollama服务进程和端⼝, 11434为ollama的默认监听端⼝: root@deepseek-vm:~# netstat -tanlp
 三:运行DeepSeek模型:
https://ollama.com/search #ollama可以部署不同类型的模型和版本

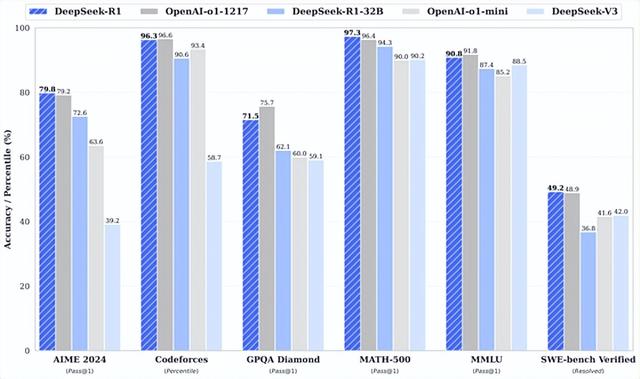
DeepSeek-R1在很多方面都已经达到或超越OpenAI-o1, 具体的模型版本可以根据实际业务需求进行安装, 本次为安装deepseek-r1:8b进行演示:
3.1:运行deepseek-r1:8b:https://ollama.com/library/deepseek-r1 #官⽅⽂档
deepseek-r1:1.5b #需要在线下载1.1GB的数据,根据网络环境和服务端负载、大约需要下载几分钟或更长时间 deepseek-r1:8b #需要在线下载4.9BG的数据,根据网络环境和服务端负载、大约需要下载几十分钟或更长时间 root@deepseek-vm:~# ollama run deepseek-r1:1.5b #运行deepseek-r1:1.5b root@deepseek-vm:~# ollama run deepseek-r1:8b #运行deepseek-r1:8b,本操作只用于说明不同版本的安装方式、可以不执行 根据模型的大小和网络环境,需要一定的下载时间,下载过程中如果网络中断或取消, 再次执行支持断点续传。
deepseek-r1:1.5b下载中:

deepseek-r1:8b下载中:

下载完成后会直接进入命令行交互式窗口,可以通过命令行窗口进行会话

3.2:对话验证:3.2.1:提问一:请认真回答一下, 到底有没有外星人?

3.2.2:提问二:介绍一下kubernetes的优缺点

四:图形客户端使用:可以使用不同的图形客户端连接DeepSeek进行交互式使用,如Chatbox、LobeChat等, 本步骤以Chatbox为例
4.1:Windows环境Chatbox图形客户端:Chatbox是一个通用的图形客户端,支持在MacOS、Windows、Linux、安卓手机、苹果手机等系统环境安装和使用, 只需要安装在需要访问DeepSeek的主机、并配置连接DeepSeek连接地址及模型版本即可, 甚至还可以直接启动网页版, 本步骤演示如何在windows系统安装和使用Chatbox, 本步骤介绍如果在Windows系统安装Chatbox及配置和使用过程。
https://chatboxai.app/zh#download #官方下载URL https://chatboxai.app/zh/help-center/connect-chatbox-remote-ollama-service-guide #安装文档 https://github.com/Bin-Huang/chatbox/releases #安装文件下载地址

4.1.1:下载安装文件:点击免费下载:

下载过程中:

下载完成:

4.1.2:安装Chatbox:在下载目录双击安装文件执行安装:

可选择为当前用户还是所有用户安装、然后点击下一步:

可选安装路径、然后单机安装:

安装过程中:

安装完成, 点击完成并运行Chatbox:

4.1.3:配置Chatbox:首次打开要配置一下使用的模型, 选择使用自己的API Key或模型:

选择使用Ollama API:

具体配置:

上下文消息数(保存的历史会话数量)可以不限制、然后点击保存:

4.1.4:对话测试:Chatbox可以通过DeepSeek进行成功对话
4.1.4.1:提问一:请认真回答一下, 到底有没有外星人?

4.1.4.2:提问二:介绍一下kubernetes项目,包括几个主要的组件和功能?

4.1.4.3:提问三:一个笼子里面有三只兔子和两只鸭,后来逃走了一只兔子,请回答以下两个问题:
1.在兔子逃走之前,笼子里一共有几条腿?
2.在一只兔子逃走之后,笼子里一共还有几条腿?
 4.1.5:如果要切换模型版本:
如果在同一个DeepSeek服务器部署了不同版本的模型,可以在Chatbox右下角进行不同版本的切换

4.2:MacOS环境Chatbox图形客户端:本步骤介绍如果在MacOS系统安装Chatbox及配置和使用过程
4.2.1:下载安装文件:苹果系统(Intel CPU)下载的Chatbox.CE-0.10.4-mac.zip,如果是windows系统则是下载Chatbox.CE-0.10.4-Setup.exe

4.2.2:安装Chatbox:苹果系统下载后解压, 会有个Chatbox CE程序:

可以拷贝到应用程序里面方便后期使用:

然后双击打开,首次打开需要信任:

进入系统菜单,设置-->隐私与安全性-->仍要打开:

确认仍要打开:

输入认证(密码或指纹认证)信息确认:

4.2.3:配置Chatbox:首次使用需要配置Chatbox连接deepseek模型, 点击左侧菜单Settings:

Chatbox配置信息如下:

4.2.4:对话测试:可选新建一个对话:

对话验证:

五:本地数据投喂:基于AnythingLLM+DeepSeek进行数据投喂训练, 用于搭建本地离线知识库等场景, 本步骤是测试搭建本地知识库,非必须不需要执行。
https://anythingllm.com/
https://github.com/Mintplex-Labs/anything-llm
5.1:下载并安装AnythingLLM: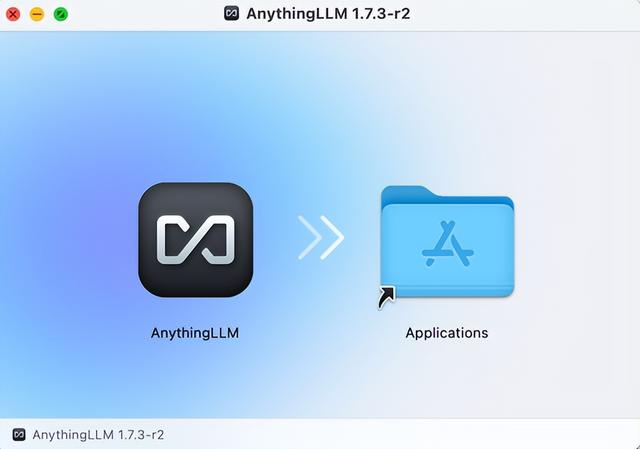
5.2:AnythingLLM基础配置:初始化AnythingLLM对接DeepSeek的配置
5.2.1:LLMPreference:
5.2.2:工作区对话设置:将聊天模式从聊天改为查询, 将会根据本地上传和识别后的数据进行响应

更新保存配置:

5.2.3:配置embedder首选项为ollama:
5.2.4:代理配置:
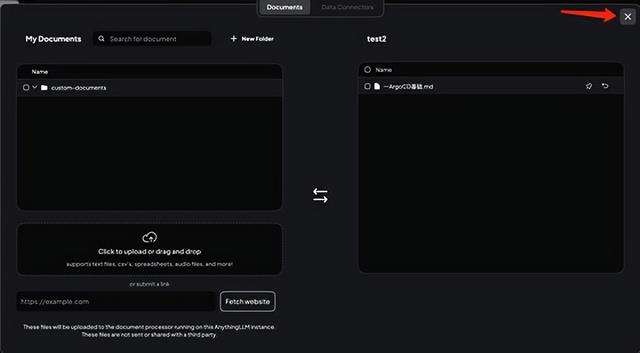
5.2.5:工作区上传测试训练文档:上传本地文档之前无法回答问题,因此要上传本地文档进行训练(支持PDF、Txt、Word、Excel、PPT等常见文档格式):

本地文档上传中:

本地文档上传完成:

选择指定的文档并移动到工作区:


保存并导入:

导入并识别中:

识别完成:

关闭窗口:
返回到对话窗口:

5.3:对话验证:DeepSeek可以根据本地的知识内容进行匹配和回答
5.3.1:基于本地文档回答成功的:
5.3.2:本地没有的内容提问及对话:经过多次提问、DeepSeek会尽可能使用本地文档内容进行回复


